
جميع الأدلةالإدارة
Leave types and balances
Set up leave types and set, adjust or bulk import leave balances.
Leave types are the categories employees pick when they apply for leave — for example casual leave, sick leave, or earned leave. Open Leave Management → Leave Types from the left menu.
Steps
- Open Leave Management → Leave Types.
- Use the Search leave types... box to find a type by ID, name, code, or notes.
- Click the eye icon on a row to view that type's full settings in a pop-up.
- Click the pencil icon to edit a type, or the trash icon to delete it (both appear only if your role allows it).
- Click Add New at the top right to create a new type — see Creating or editing a leave type.
Availability and proof
Only active leave types are offered when applying for leave. Proof Required determines whether the employee must attach a supporting document.
Tips
- A leave type that's already used by existing leave requests can't be deleted — make it Inactive instead.
Creating or editing a leave type
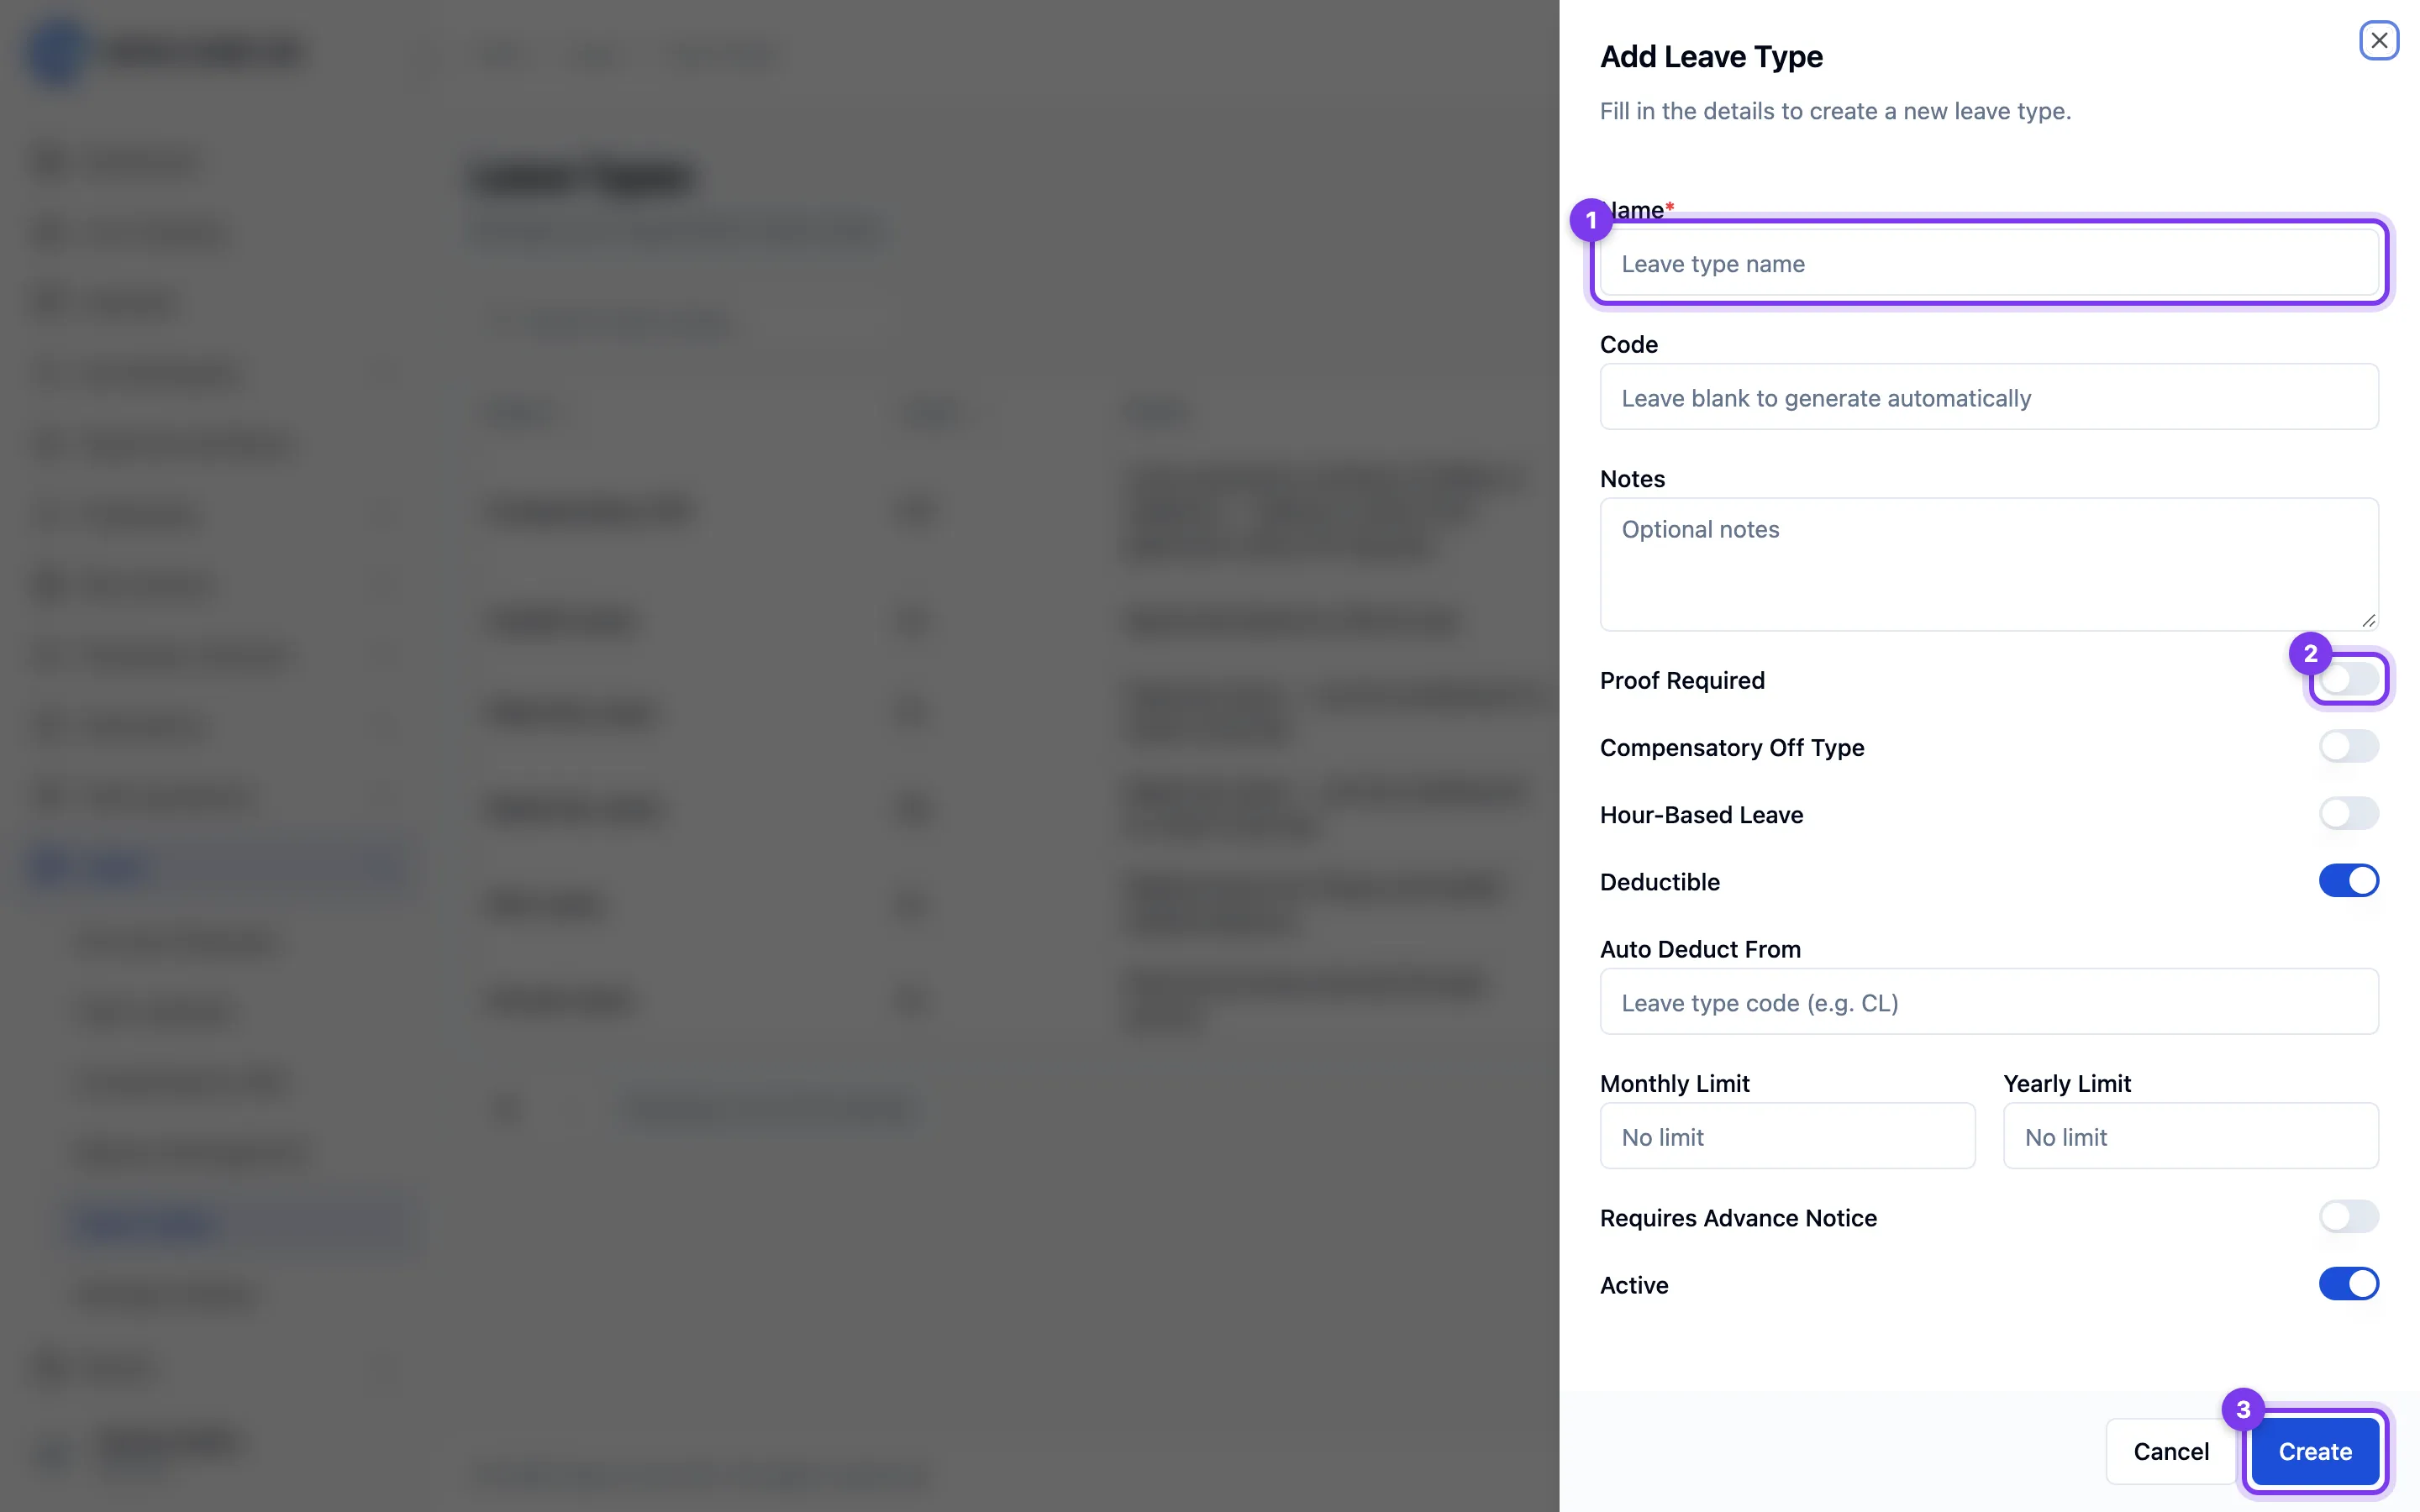
You create and edit leave types from a slide-over panel on the Leave Types screen. Open Leave Management → Leave Types and click Add New, or click the pencil icon on an existing type.
Steps
- Open Leave Management → Leave Types.
- Click Add New to create one, or the pencil icon on a row to edit one. The Add Leave Type / Edit Leave Type panel slides in from the right.
- Fill in the fields:
- Name (required) — the leave type's name.
- Code (required) — a short code such as "CL", "SL", or "EL".
- Notes — optional notes.
- Proof Required — turn on if a supporting document must be attached when this type is used.
- Compensatory Off Type — turn on if this type represents compensatory off.
- Deductible — turn on if using this type should reduce the employee's leave balance.
- Auto Deduct From — optionally enter another leave type's code to draw from automatically.
- Monthly Limit — the most days of this type allowed per month; leave blank for no limit.
- Yearly Limit — the most days of this type allowed per year; leave blank for no limit.
- Requires Advance Notice — turn on if employees must give notice before taking this leave. When on, set Advance Notice Days.
- Status — on for Active, off for Inactive.
- Click Create (or Update when editing).
Tips
- The annual entitlement each employee actually gets is set on the Leave balance management screen, not here — this screen only defines the leave type and its limits.
- Codes need to be unique; if you enter one that's already in use you'll be asked to change it.
Note: There is no separate "annual allotment", "paid" or "carry-forward" field on this form. Yearly entitlement is handled through Balance Management rather than on the leave type itself.
Leave balance management
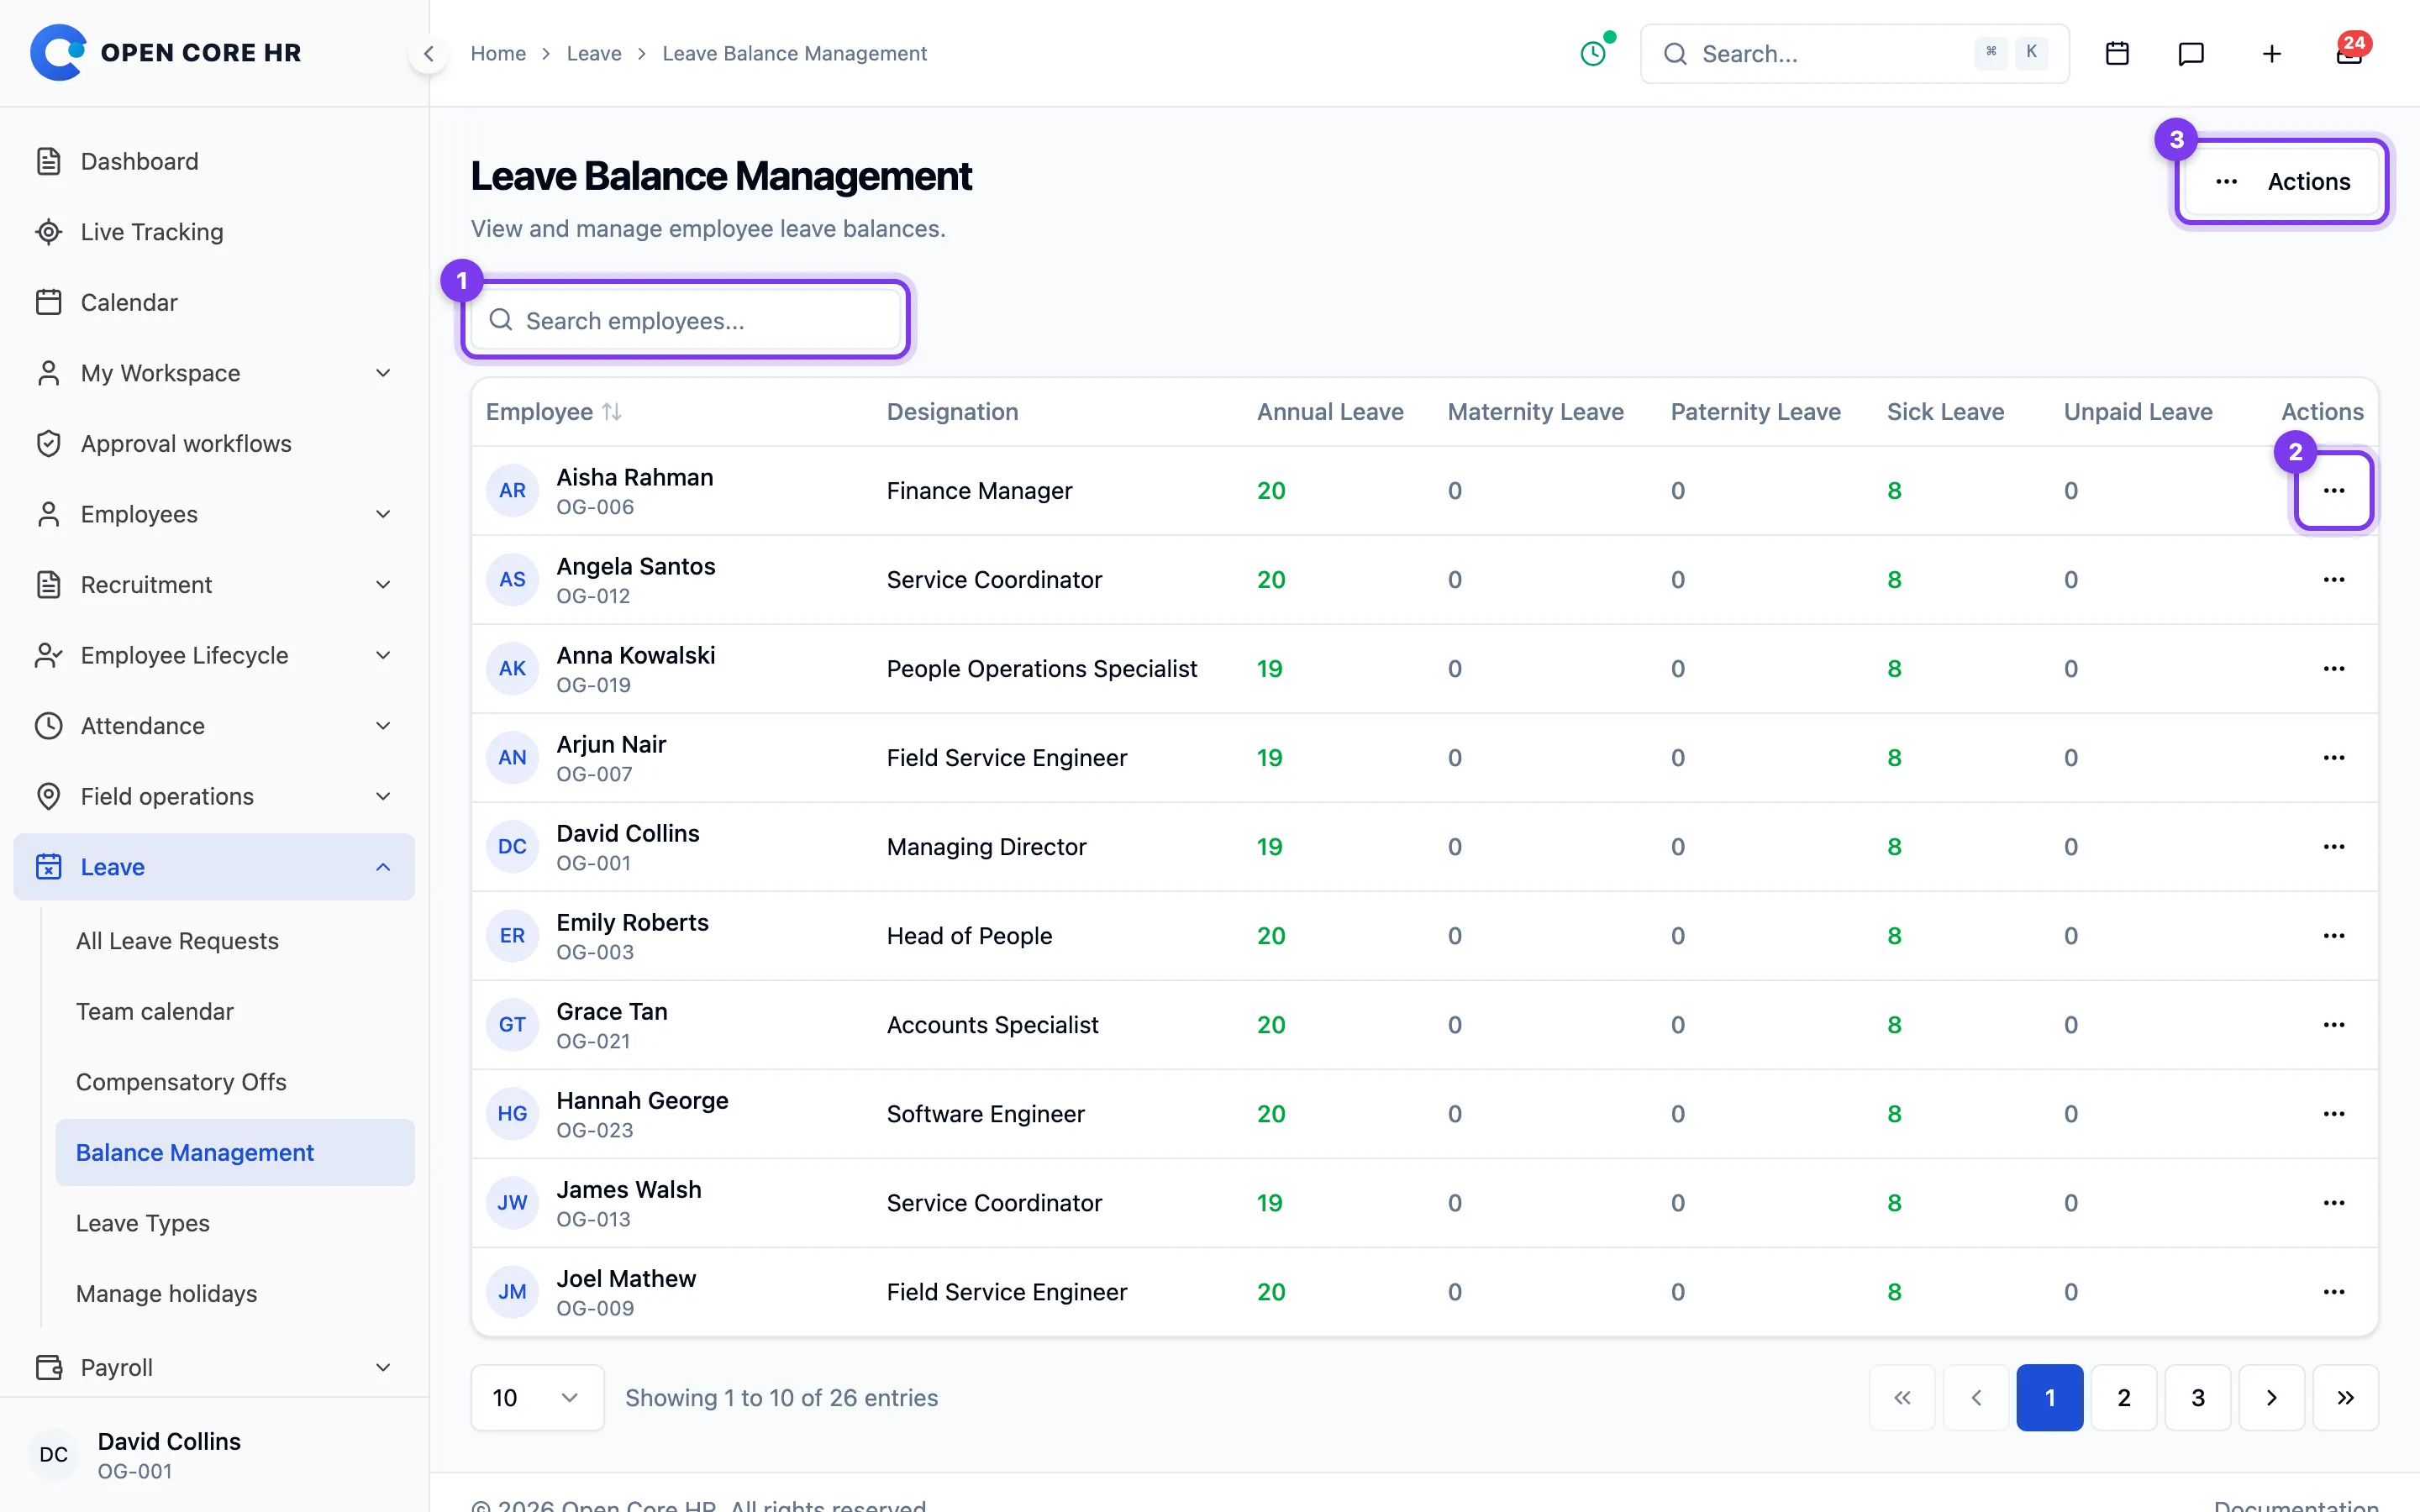
Use Leave Management → Balance Management to review current leave balances, set initial entitlements and make documented adjustments. Spreadsheet imports and exports are in Import & Export; see Bulk importing leave balances.
Steps
- Open Leave Management → Balance Management.
- Use the Search employees... box to find someone by name or employee code.
- Click the eye icon on a row to open that employee's balance detail page.
- If your role can manage balances, use Bulk Set Initial Balance for a group or open an employee to set or adjust their balance. See Setting and adjusting leave balances.
Reviewing balances
Open an employee to review entitlement, carried-forward days, adjustments, usage, available days, and loss-of-pay (LOP) days for the selected year. Use Set Initial for a balance that has not been set, or Adjust for an existing balance, if you have permission. Review Recent Adjustments for the reason and before/after values of manual changes.
Use View Summary Report to review entitlement, usage, availability, and pending leave across the organisation.
Tips
- "LOP" stands for loss of pay — days an employee took beyond their available balance.
Setting and adjusting leave balances
There are two ways to change one employee's leave balance: set the initial entitlement for a leave type that doesn't have one yet, or make an adjustment (add or deduct days) on a leave type that already has a balance. Both are done from the employee's balance page.
Steps
Set the initial balance for a leave type
- Open Leave Management → Balance Management and click the eye icon next to the employee.
- Find the leave type card (or table row) that shows no balance yet and click Set Initial. A Set Initial Balance panel slides in.
- The Leave Type is shown (read-only).
- Enter the Entitled Leaves — the number of days the employee should start the year with (steps of 0.5 are allowed).
- Click Set Balance.
Adjust an existing balance
- On the same employee's balance page, find a leave type that already has a balance and click Adjust. An Adjust Balance panel slides in.
- The Leave Type is shown (read-only).
- Choose the Adjustment Type — Add or Deduct.
- Enter the number of Days (steps of 0.5 are allowed).
- Enter a Reason — this is required.
- Click Apply Adjustment.
The change is recorded in the Recent Adjustments log on the page, showing the before/after balance, the reason, and who made it.
Tips
- Set Initial appears only before a leave type has any balance for that year; after that, use Adjust.
- To set a starting balance for many employees at once, use Bulk Set Initial Balance or an import instead — see Bulk importing leave balances.
- The Set Initial and Adjust buttons appear only if your role has the matching permission.
Bulk importing leave balances
Use a spreadsheet to set different initial leave entitlements for many employees, or use Bulk Set Initial Balance to apply the same entitlement to a group. Both require permission to manage leave balances. Initial entitlements are the starting allowance for a leave type and year; they are not the employee's remaining available balance.
Import initial entitlements
- Open Import & Export, choose Leave balances under imports, and download the current template.
- Replace the sample employees with real employee codes or email addresses. Enter a value in each leave-type column you intend to set; leave unrelated columns blank. Use the headings from the current template, which reflects the configured leave types.
- Select the year explicitly and upload the file. Review the year before validating; the same employee can have different entitlements in different years.
- Validate and review the result. Correct all errors in a new upload before confirming. No balances change during preview.
- Confirm the import and check History for completion. See Importing a spreadsheet.
Provide either the employee's unique code or their email. Use values from 0 to 365 days for initial entitlement. A blank leave-type cell leaves that entitlement untouched; zero explicitly sets a zero entitlement where initial setup is allowed.
The import sets the entitlement for each supplied employee, leave type and year, including replacing an existing entitlement. Available leave is recalculated with existing usage, carried-forward leave and adjustments preserved. An entitlement that would make available leave negative is rejected. Review existing entitlements before importing; use an adjustment with a reason when the change is an addition or deduction rather than a new entitlement.
Export entitlements
Choose Leave balances under exports in Import & Export, select the year and request an XLSX, CSV or PDF file. Download the completed file from History. It contains initial entitlement by leave type, not available leave after usage and adjustments. Use the balance detail or summary report when you need those figures.
Set the same initial balance for many employees
- Open Leave Management → Balance Management, then Actions → Bulk Set Initial Balance.
- Set the Year.
- Pick the Leave Type.
- Enter the Entitled Days to give each employee (steps of 0.5 are allowed).
- Leave Apply to All Employees on to set it for every active employee, or turn it off and add specific employees with the search box.
- Click Set Balance.