
جميع الأدلةالوحدات الإضافية
Loans
Create, approve, disburse, repay and close employee loans, and review loan reports.
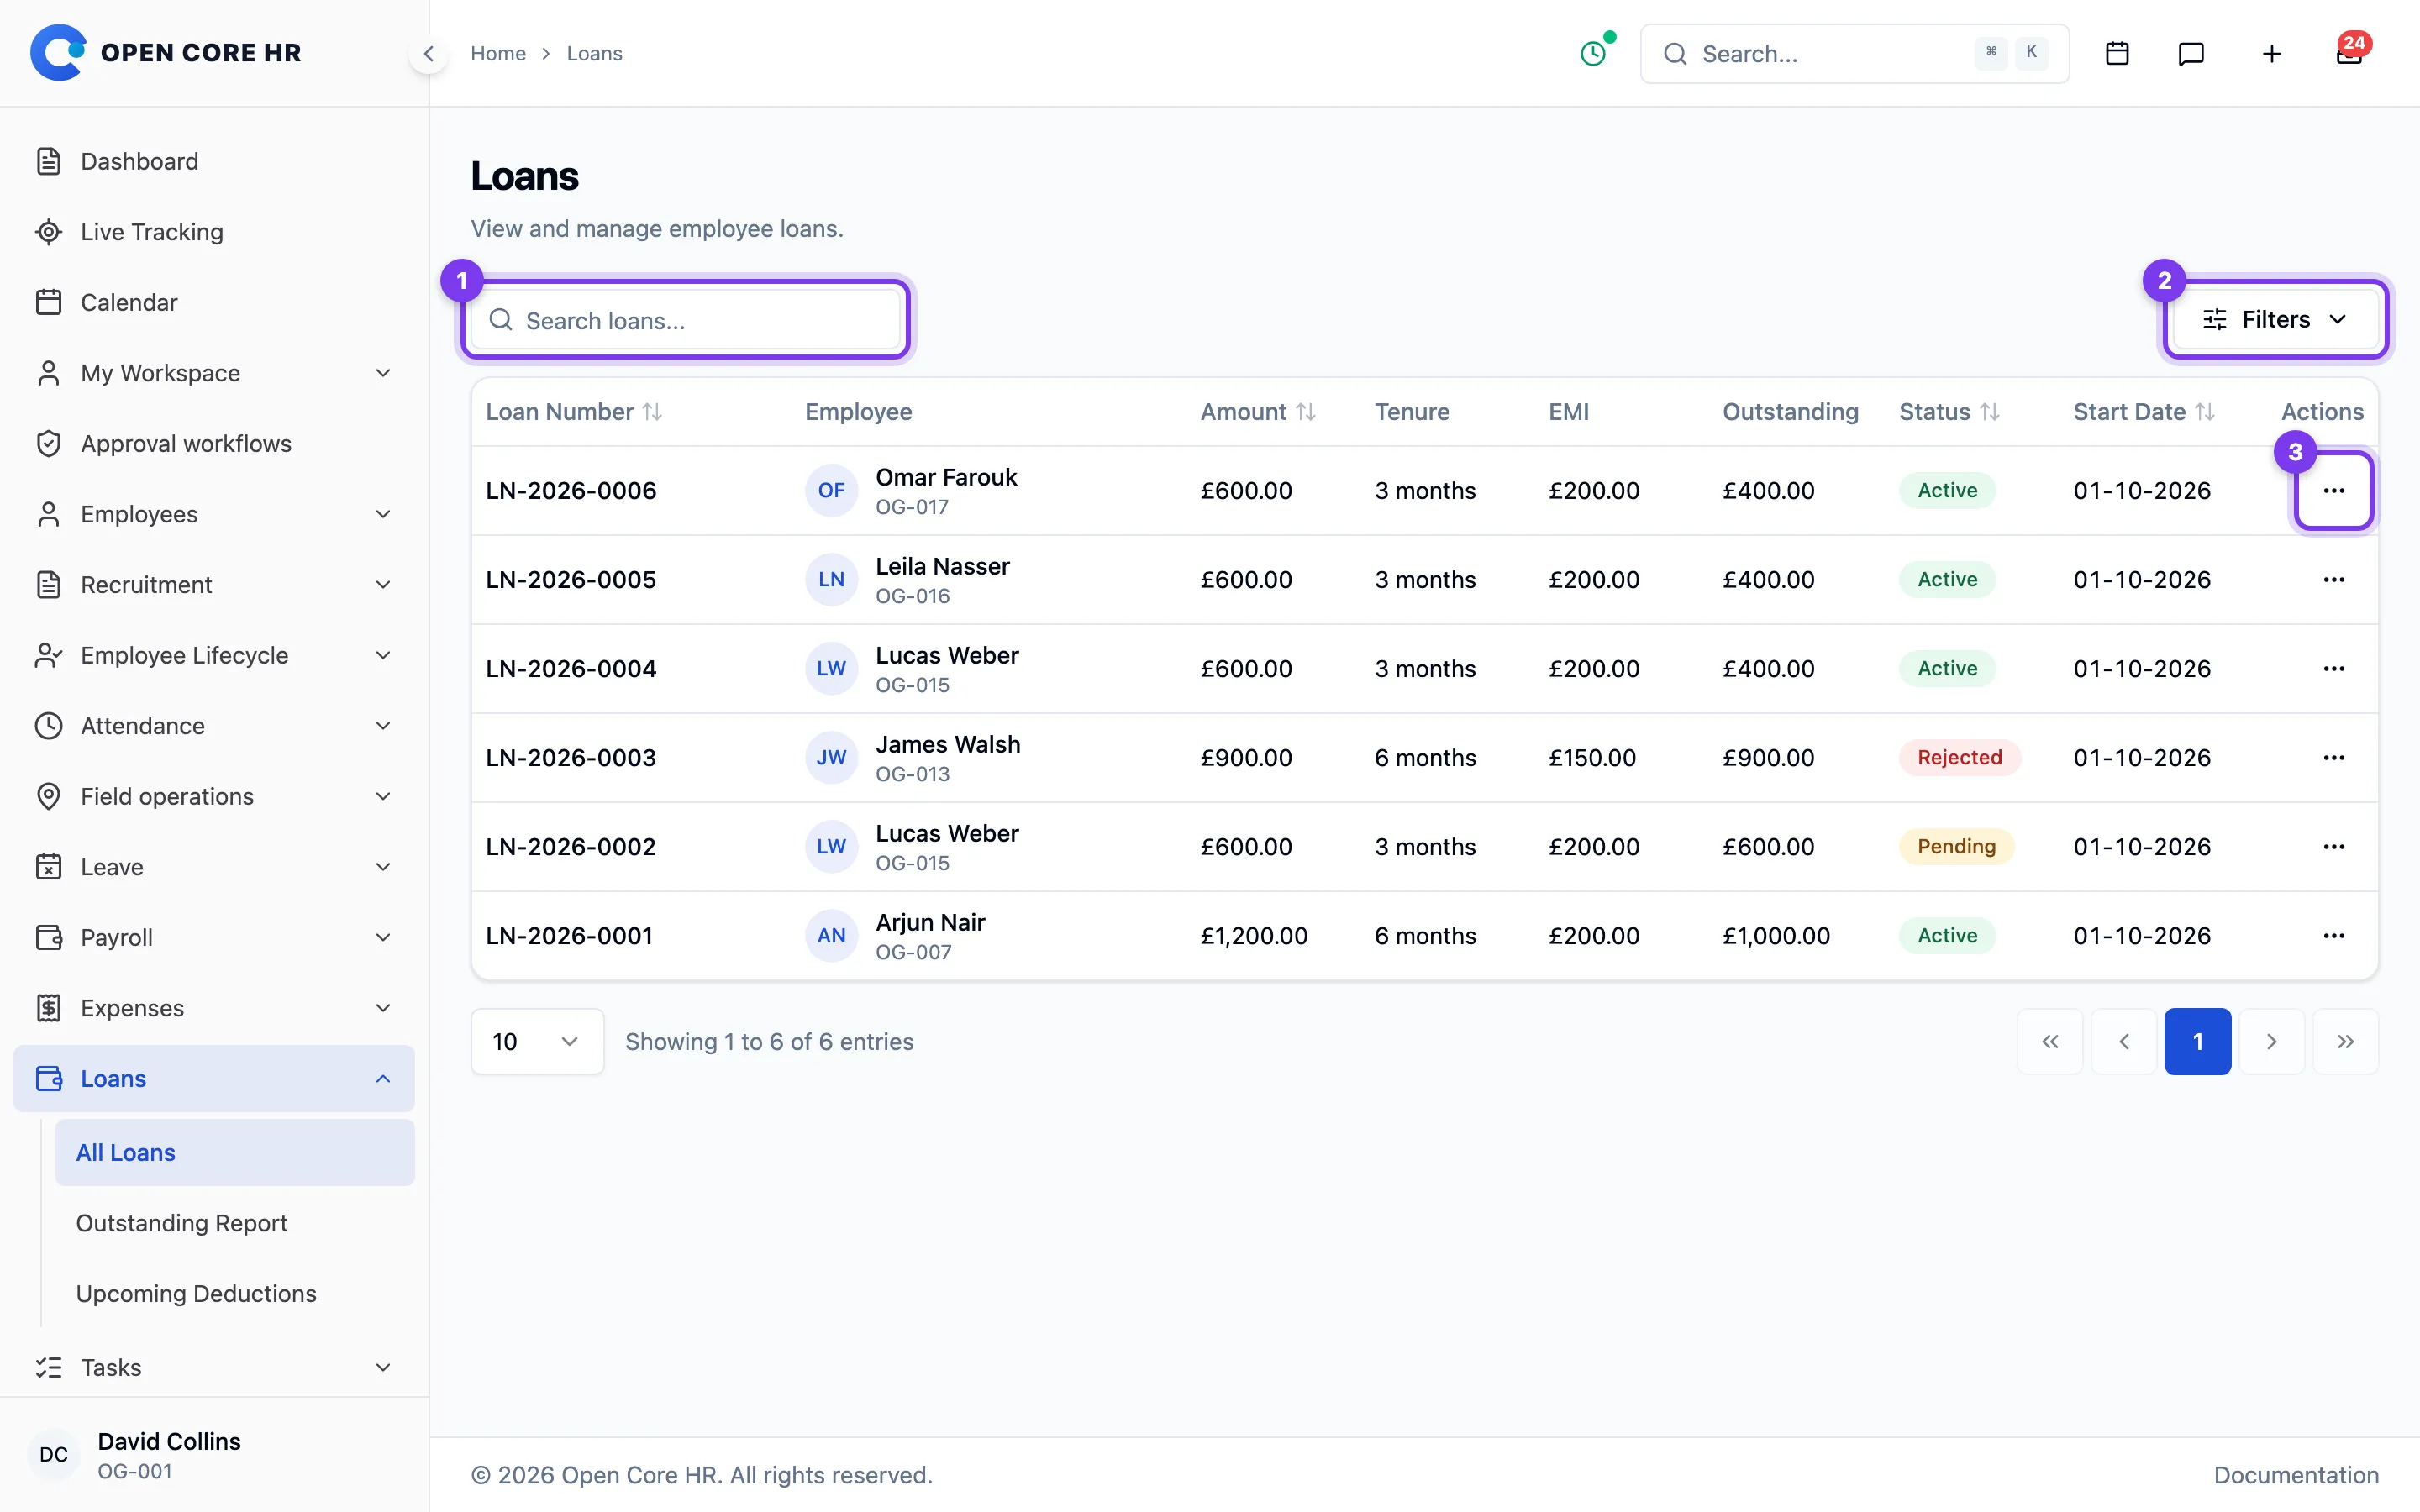
The All Loans page lists every employee loan in your organization, with its amount, monthly instalment, outstanding balance and status. Open it from Loans > All Loans in the left menu.
Steps
- In the left menu, choose Loans > All Loans.
- Use the Search loans... box to find a loan by loan number or by the employee's name or code.
- Use the status dropdown (showing All Statuses by default) to narrow the list to one status: Pending, Approved, Active, Completed, Rejected or Cancelled.
- Click the Loan Number, Amount, Status or Start Date column headers to sort.
- Use the eye icon in the Actions column to open a loan's details. See A loan's details.
Loan statuses
- Pending — submitted and waiting for approval.
- Approved — approved, but not yet disbursed.
- Active — disbursed; repayments are in progress.
- Completed — fully repaid or closed.
- Rejected — turned down during approval.
- Cancelled — withdrawn before approval finished.
You can edit a loan while it is Pending or Approved, and disburse it once it is Approved.
Tips
- Loan applications go through your organization's approval workflow. Review and approve them from the Approvals inbox — see Approving and disbursing a loan.
- Employees apply for their own loans from the personal page in its module under My loans.
- To edit a pending or approved loan, click the pencil icon in the Actions column. You can change the Amount, Tenure (months), Start Date, Purpose and Notes; the estimated EMI is recalculated automatically.
Loan settings
Administrators set loan rules in Settings → Loans:
- Loan number prefix: new loans are numbered PREFIX-YEAR-0001. Existing loans keep their numbers.
- Maximum repayment period: the longest tenure employees and HR can enter.
- Create monthly deductions on day: the day each month when payroll deductions are created. In shorter months they are created on the last day.
- Close loans automatically when fully repaid: when off, HR closes repaid loans manually.
Creating a loan
A loan starts as a request: the employee applies for it from the personal page in its module, and you take over from there to approve and disburse it. The admin All Loans page does not have a "new loan" button — loans always begin as an employee application.
How a loan is created
- The employee opens My loans in the web application and chooses Apply for Loan.
- They fill in the request:
- Amount — the amount they want to borrow.
- Tenure (months) — how many months to repay over, up to the maximum in Settings → Loans (60 by default).
- Start Date — when the repayments should begin.
- Purpose — the reason for the loan (optional).
- Notes — any extra detail (optional).
- Security Deposits / Supporting Documents — optionally, one or more entries. Each entry has a type (Supporting Document, Blank Cheque, Post-Dated Cheque or Other); cheque entries need a cheque number and bank name, and any entry can include an uploaded file.
- When they submit, the request enters your organization's approval workflow and appears in Loans > All Loans with the status Pending.
Your part
- Review the application in the Approvals inbox and approve or reject it. See Approving and disbursing a loan.
- While the loan is still Pending or Approved, you can adjust it from All Loans: click the pencil icon in the Actions column to change the Amount, Tenure (months), Start Date, Purpose or Notes. The estimated EMI updates automatically.
- Once approved, disburse the loan to activate it and create the repayment schedule. See Approving and disbursing a loan.
Tips
- The EMI is the loan amount divided evenly across the tenure — there is no separate interest field.
- The loan number is generated automatically when the request is submitted.
Troubleshooting
- The admin All Loans page offers view, edit and disburse only — there is no "add loan" action, so every loan starts from the self-service application route described above.
Creating a loan on behalf of an employee
In the web admin area there is no "new loan" button on the All Loans page — loans always start as an employee application from the personal page in its module. There is no admin form that lets you pick an employee and raise a loan for them from Loans > All Loans.
- Loan Management — Open the Loan Management group in the menu.
- All Loans — Then choose All Loans.
What you can do instead
- Ask the employee to submit the request themselves from My loans in the web application. Once it is in, it appears under Loans > All Loans as Pending, and you can approve, edit and disburse it. See Creating a loan and Approving and disbursing a loan.
- While the request is Pending or Approved, you can fine-tune the Amount, Tenure (months), Start Date, Purpose and Notes from the pencil icon in the Actions column.
Troubleshooting
- The underlying create action accepts an employee selection, but no employee picker is exposed on the web admin All Loans screen.
Approving and disbursing a loan
A loan application moves through two steps before repayments begin: it is approved through your organization's approval workflow, and then it is disbursed. Disbursing the loan activates it, builds the repayment schedule and notifies the employee.
Approving a loan
- When an employee submits a loan request, it appears in the Approvals inbox in the left menu (and under Loans > All Loans with the status Pending).
- Open the request from the Approvals inbox, review the amount, tenure and any attached documents, and approve or reject it.
- After approval, the loan's status changes to Approved on the All Loans page. If it is rejected, the status becomes Rejected.
Disbursing a loan
- In the left menu, choose Loans > All Loans.
- Find the loan — its status must be Approved. Use the status dropdown to show only Approved loans if needed.
- In the Actions column, click the bank-note (disburse) icon.
- A confirmation appears, showing the amount and loan number and noting that this will activate the loan, create the repayment schedule for the loan's tenure, and notify the employee.
- Click Disburse to confirm.
What happens after disbursing
- The loan's status changes to Active.
- A repayment schedule is created with one instalment per month for the loan's tenure.
- If the loan is set to deduct from salary, monthly payroll deductions are scheduled — these appear in the Upcoming deductions report.
- The employee receives a notification.
Tips
- You can still edit an Approved loan (amount, tenure, start date, purpose, notes) before disbursing it — use the pencil icon in the Actions column.
- A loan can only be disbursed once. If a schedule already exists, the disburse action is not available.
Troubleshooting
- No disburse icon on a loan — the loan is not in the Approved state, or it has already been disbursed. Only Approved loans can be disbursed.
- There is no separate approve button on the All Loans page: approval happens in Inbox → To do, through the loan approval workflow.
A loan's details
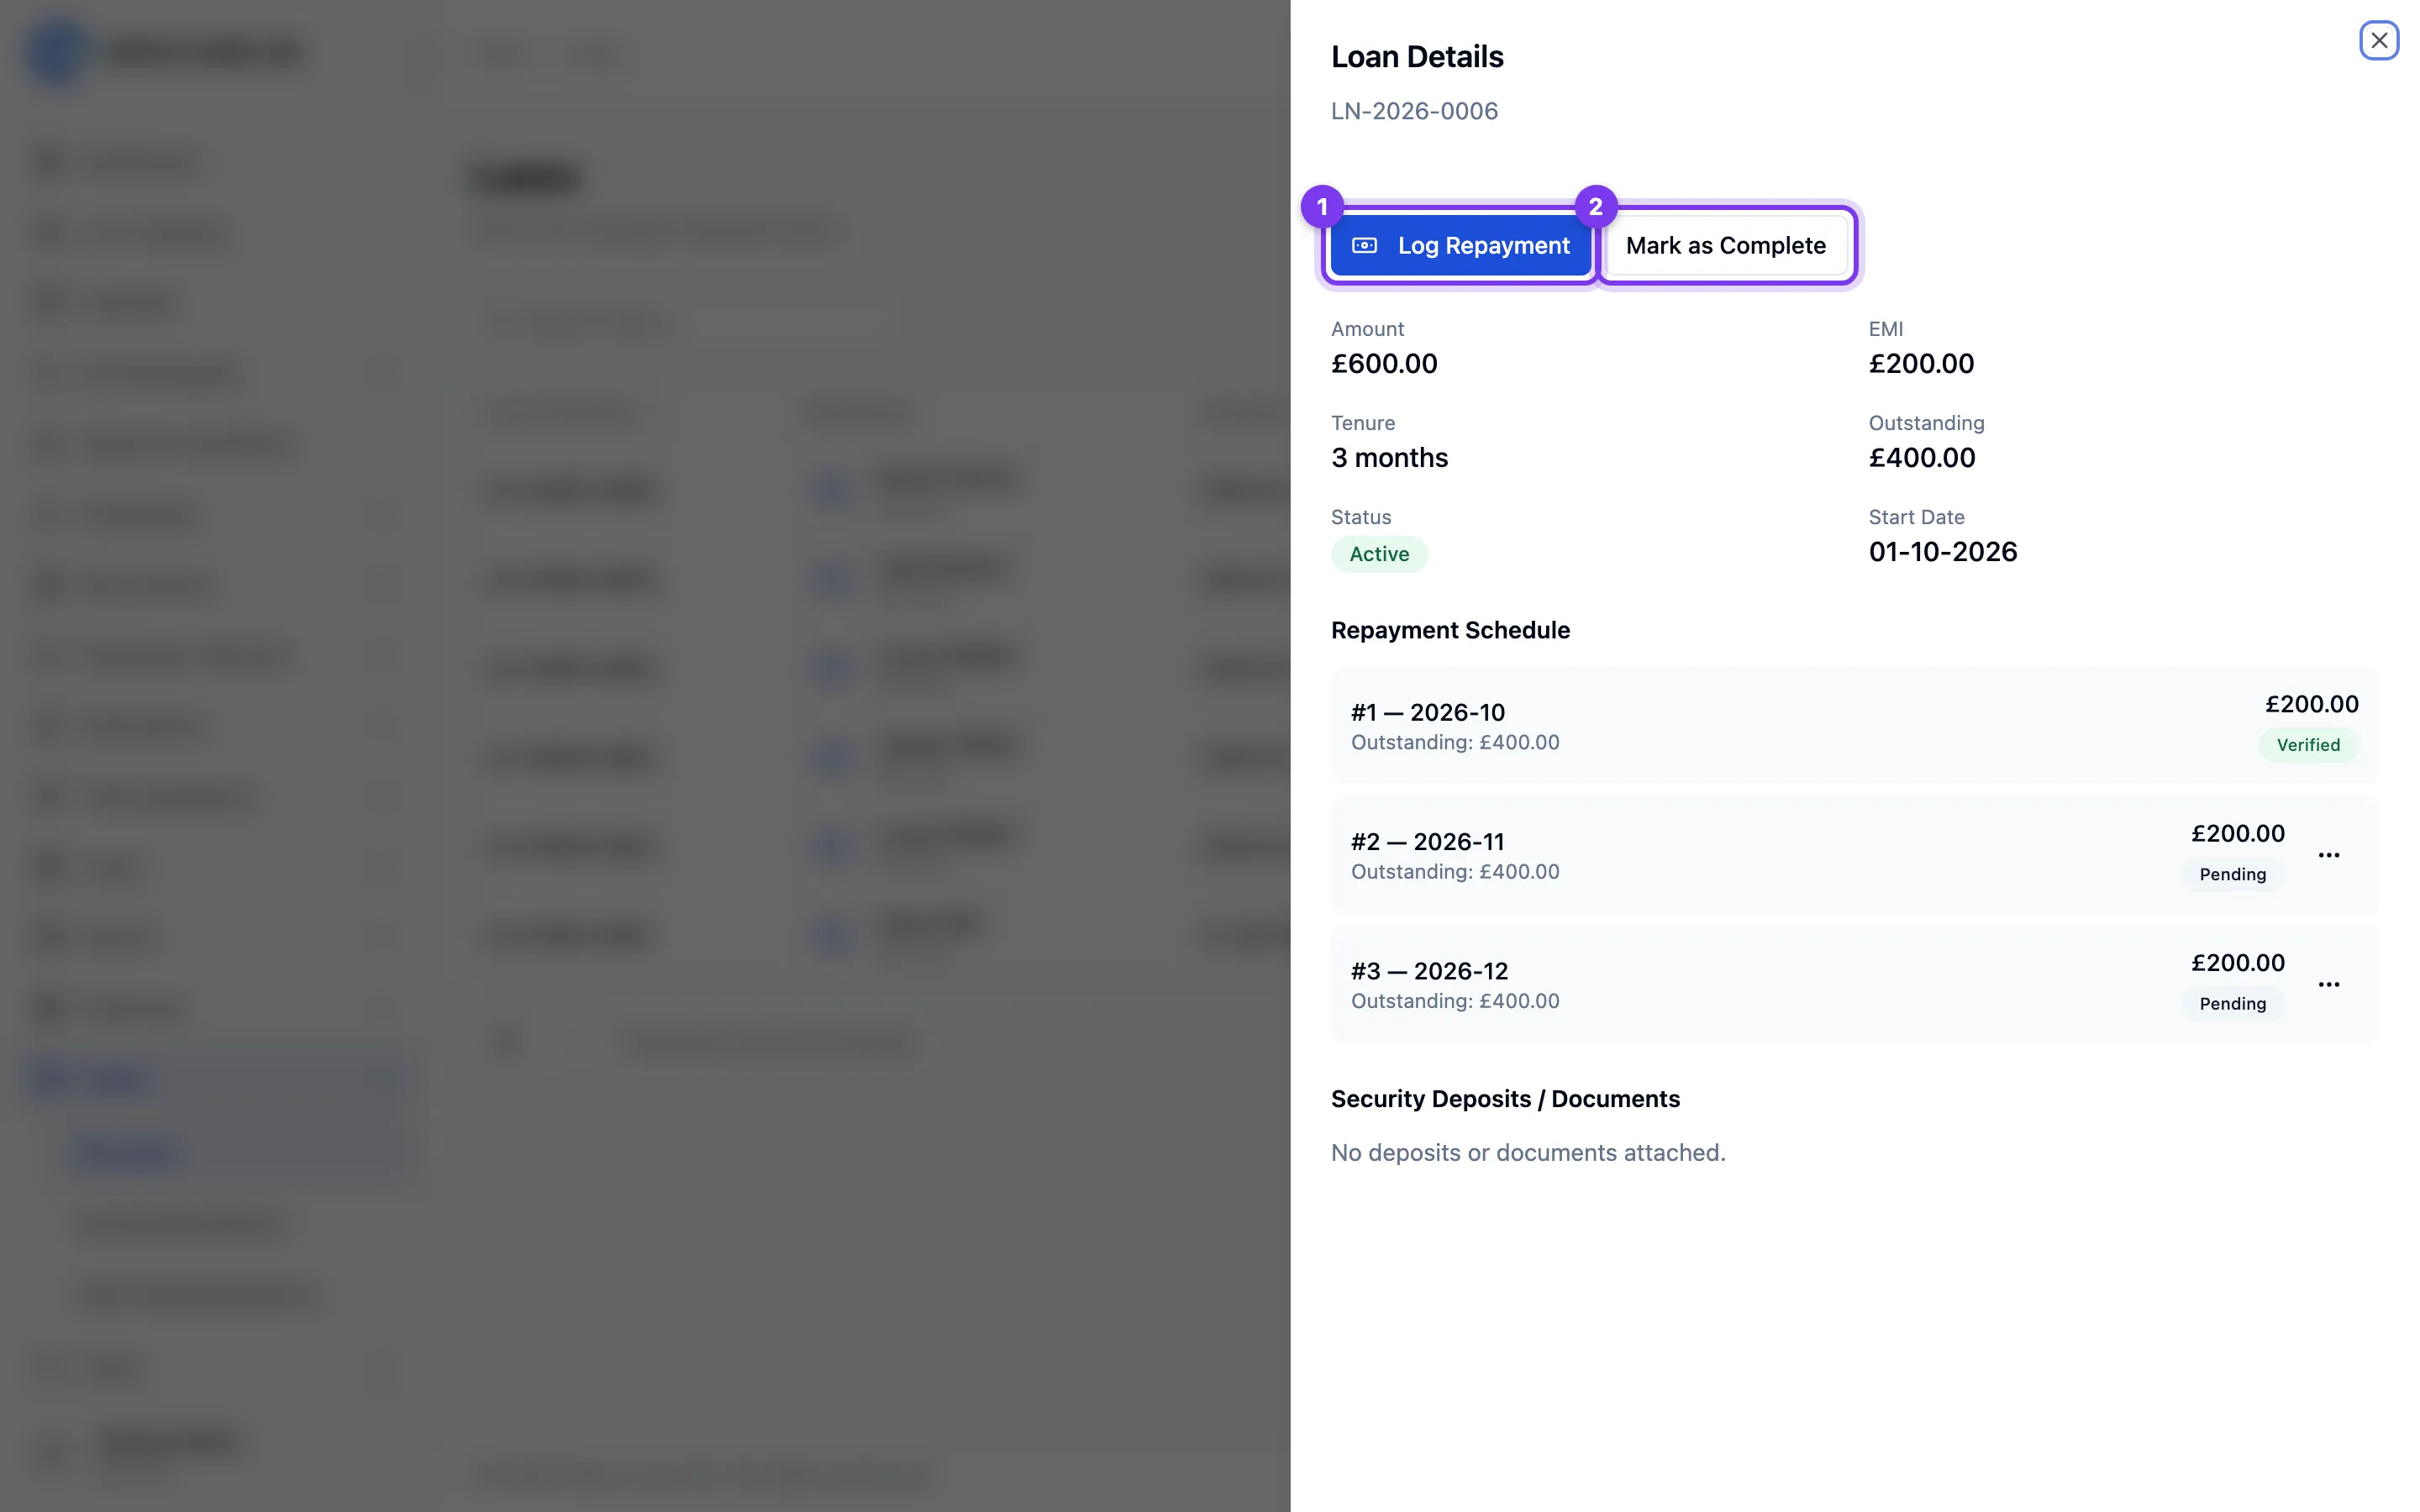
The loan details panel shows everything about one loan: its summary figures, the month-by-month repayment schedule, and any security deposits or supporting documents attached to it. It opens as a slide-over from the All Loans page.
Steps
- In the left menu, choose Loans > All Loans.
- Find the loan and click the eye icon in the Actions column.
- The Loan Details panel slides in from the right, headed by the loan number.
Reviewing repayment
Check the principal, monthly instalment (EMI), outstanding balance, and repayment schedule. The schedule is created when the loan is disbursed.
For an Active loan, use Log Repayment to record a payment, or Mark as Complete to close the loan. Review attached security deposits and documents when needed.
Tips
- You can also reach this panel directly from the Approvals page — opening a loan approval takes you to All Loans with the loan's detail panel already open.
- There is no separate repayment-history feed: the schedule rows themselves carry each month's payment status.
Loan security deposits
A loan can have one or more security deposits or supporting documents attached to it — for example a blank cheque, a post-dated cheque, or a scanned agreement. You can see them all in the loan's details panel.
Where they come from
When an employee applies for a loan in the web application, they can add Security Deposits / Supporting Documents to the request. Each entry has a type — Supporting Document, Blank Cheque, Post-Dated Cheque or Other — and cheque entries must include a cheque number and bank name. Any entry can include an uploaded file (PDF or image).
Viewing a loan's security deposits
- In the left menu, choose Loans > All Loans.
- Find the loan and click the eye icon in the Actions column.
- In the Loan Details panel, scroll to the Security Deposits / Documents section.
- Each row shows the type, a status badge, the cheque number and bank name (for cheque entries), a link to download any attached file, and any notes.
Tips
- Security deposit and document records are kept for the life of the loan as part of its history.
- A deposit moves from pending to received to returned, but those transitions are not exposed as buttons in the web admin loan details panel.
Loan repayments
When a loan is disbursed, it gets a repayment schedule with one instalment per month. As payments come in, you record them against the loan; the schedule then shows which months are paid and how much is still outstanding.
Recording a repayment
- In the left menu, choose Loans > All Loans.
- Find the loan — it must be Active — and click the eye icon in the Actions column.
- In the Loan Details panel, click Log Repayment.
- In the Log Repayment dialog, fill in:
- Amount — the payment amount. It defaults to the next unpaid instalment's EMI.
- Repayment Date — the date of the payment. It defaults to the next unpaid instalment's due date.
- Method — Bank Transfer, Cash, Cheque or Other.
- Reference Number — the UTR, cheque number or transaction ID (optional).
- Comments — any extra detail (optional).
- Click Log Repayment to save.
What happens next
- The payment is recorded against the matching month in the schedule, and that month is marked as paid.
- If you log less than that month's instalment, the unpaid remainder stays pending for the same month so you can log it later. If you log more, the extra reduces the next unpaid instalments.
- A month that is already fully paid does not accept another repayment. Log an early payment against the month it covers instead.
- The loan's Outstanding figure is reduced.
- If the loan is fully repaid, it is closed automatically and the employee is notified.
Viewing the schedule
In the Loan Details panel, the Repayment Schedule section lists every scheduled month with its instalment number, the remaining outstanding after that month, the EMI amount, and a status badge — for example Pending (not yet paid), Completed or Verified (paid), or Overdue.
Tips
- Loans set to deduct from salary are repaid through payroll; the scheduled deductions show up in the Upcoming deductions report.
Troubleshooting
- No "Log Repayment" button — the loan is not Active, or you do not have permission to manage loan repayments.
- A repayment you log here is recorded as already verified. Verifying or rejecting a repayment an employee submitted from the mobile app is supported by the system but has no control in this panel.
Closing a loan
Closing a loan marks it as completed — for example when the employee has settled the balance another way, or the remaining amount is being written off. A loan also closes automatically once it is fully repaid.
Steps
- In the left menu, choose Loans > All Loans.
- Find the loan — it must be Active — and click the eye icon in the Actions column.
- In the Loan Details panel, click Mark as Complete.
- In the Close Loan dialog, type a Final Remark explaining why the loan is being closed (for example, settled by the employee, or written off). This is required.
- Click Confirm Close.
What happens next
- The loan's status changes to Completed.
- Your final remark is added to the loan's notes.
- The employee and the relevant administrators are notified.
- The change cannot be undone.
Tips
- You don't need to close a loan that has been fully repaid — it closes on its own once the last instalment is recorded.
- Closing is only available for Active loans. A loan that is still Pending can instead be cancelled before approval finishes.
Outstanding loans report
The Outstanding Loans report lists every active loan that still has a balance to be repaid. Use it to see, at a glance, who owes what. Open it from Loans > Outstanding Report in the left menu.
Steps
- In the left menu, choose Loans > Outstanding Report.
- Use the Search loans... box to find a loan by loan number or by the employee's name or code.
- Click a column header to sort.
Reviewing outstanding loans
The report covers active loans with an outstanding balance. Compare the remaining amount, monthly instalment (EMI), and scheduled end date when following up on repayments.
Tips
- Loans that are still pending or approved, and loans that have been completed or rejected, don't appear here — only active loans with a balance.
- For the full list of loans in every state, use All Loans. For the deductions due in the next payroll period, use Upcoming deductions report.
Upcoming deductions report
The Upcoming Deductions report shows the loan instalments due to be deducted from salary in the coming payroll period. Use it when preparing payroll. Open it from Loans > Upcoming Deductions in the left menu.
Steps
- In the left menu, choose Loans > Upcoming Deductions.
- Use the Search employees... box to find a row by loan number or by the employee's name or code.
- Click a column header to sort.
Checking payroll deductions
The report lists active loans set to deduct from salary. Check the employee, deduction amount, and payroll month before processing payroll.
When Loan deductions is enabled in Settings → Payroll, a new pay run reserves eligible generated instalments for its month. Refresh payroll inputs after generating a missing schedule, then review and calculate again. Reserved instalments cannot also be paid or closed manually. Cancelling the unfinalized run releases them.
Finalizing payroll credits the loan repayment once. A later reversal of the employee's bank payment reopens net salary owed; it does not undo the loan deduction. Do not add the same instalment as a manual payroll deduction.
Tips
- Only loans that are Active and set to deduct from salary appear here. Loans repaid manually don't show in this report — record those payments from the loan's details panel instead. See Loan repayments.
- For a fuller view of balances across all active loans, see the Outstanding loans report.
Your loans (employees)
The My Loans screen in the Documents module shows your loan applications and the loans you currently hold.
Checking your loans
Review the monthly instalment (EMI), outstanding balance, and repayment dates. A Pending request can be cancelled; open a loan to review its repayment schedule.
Steps
- Open My Loans from the module menu.
- Use the search box to find a loan.
- Click the eye icon in the Actions column to view the loan's details and repayment schedule — see A loan's details.
Applying for a loan
- On the My Loans screen, click Apply for Loan. A panel slides in from the right.
- Enter the Amount and Tenure (months) (up to the limit your company sets, 60 months by default). An estimated monthly EMI is shown.
- Pick a Start Date. It must be today or a later date.
- Optionally add a Purpose and Notes.
- Optionally add up to five Security Deposits / Supporting Documents entries. For each entry choose a Type (Supporting Document, Blank Cheque, Post-Dated Cheque, or Other); for cheque types, enter the Cheque Number and Bank Name. You can attach a file (PDF, JPG, or PNG) and add notes.
- Click Submit Application. The request is sent for approval and appears in your list with status Pending.
Cancelling a pending request
- In the Actions column of a Pending loan, click the cancel (X) icon.
- Confirm in the dialog. The request is retracted and the approval workflow stops. You can submit a new request afterwards.
Your loan's details
Open any loan to see its repayment schedule and a summary of what's left to pay.
Steps
- Open My Loans from the module menu.
- Click the eye icon next to the loan. The Repayment Schedule panel slides in from the right.
Checking repayment
Review the monthly instalment (EMI), outstanding balance, and due dates in the repayment schedule. Ask HR if you need to confirm a security deposit; it is not included in this view.