
All guidesAdd-on modules
Assets
Track company assets through inventory, assignment, return, maintenance and documents.
The All Assets screen lists every asset your organization tracks, with search, filters, and quick actions. Open Asset Management → All Assets to get there.
Steps
- In the left menu, open Asset Management → All Assets.
- Use the Search assets... box to find an asset by name, serial number, brand, model, or category.
- Use the All Categories dropdown to show only assets in one category.
- Use the All Statuses dropdown to show only assets with a given status: Available, Assigned, Maintenance, or Retired.
- Click a column header (Name, Category, Serial Number, Status) to sort by it.
- Use the row actions on the right to view, edit, or delete an asset.
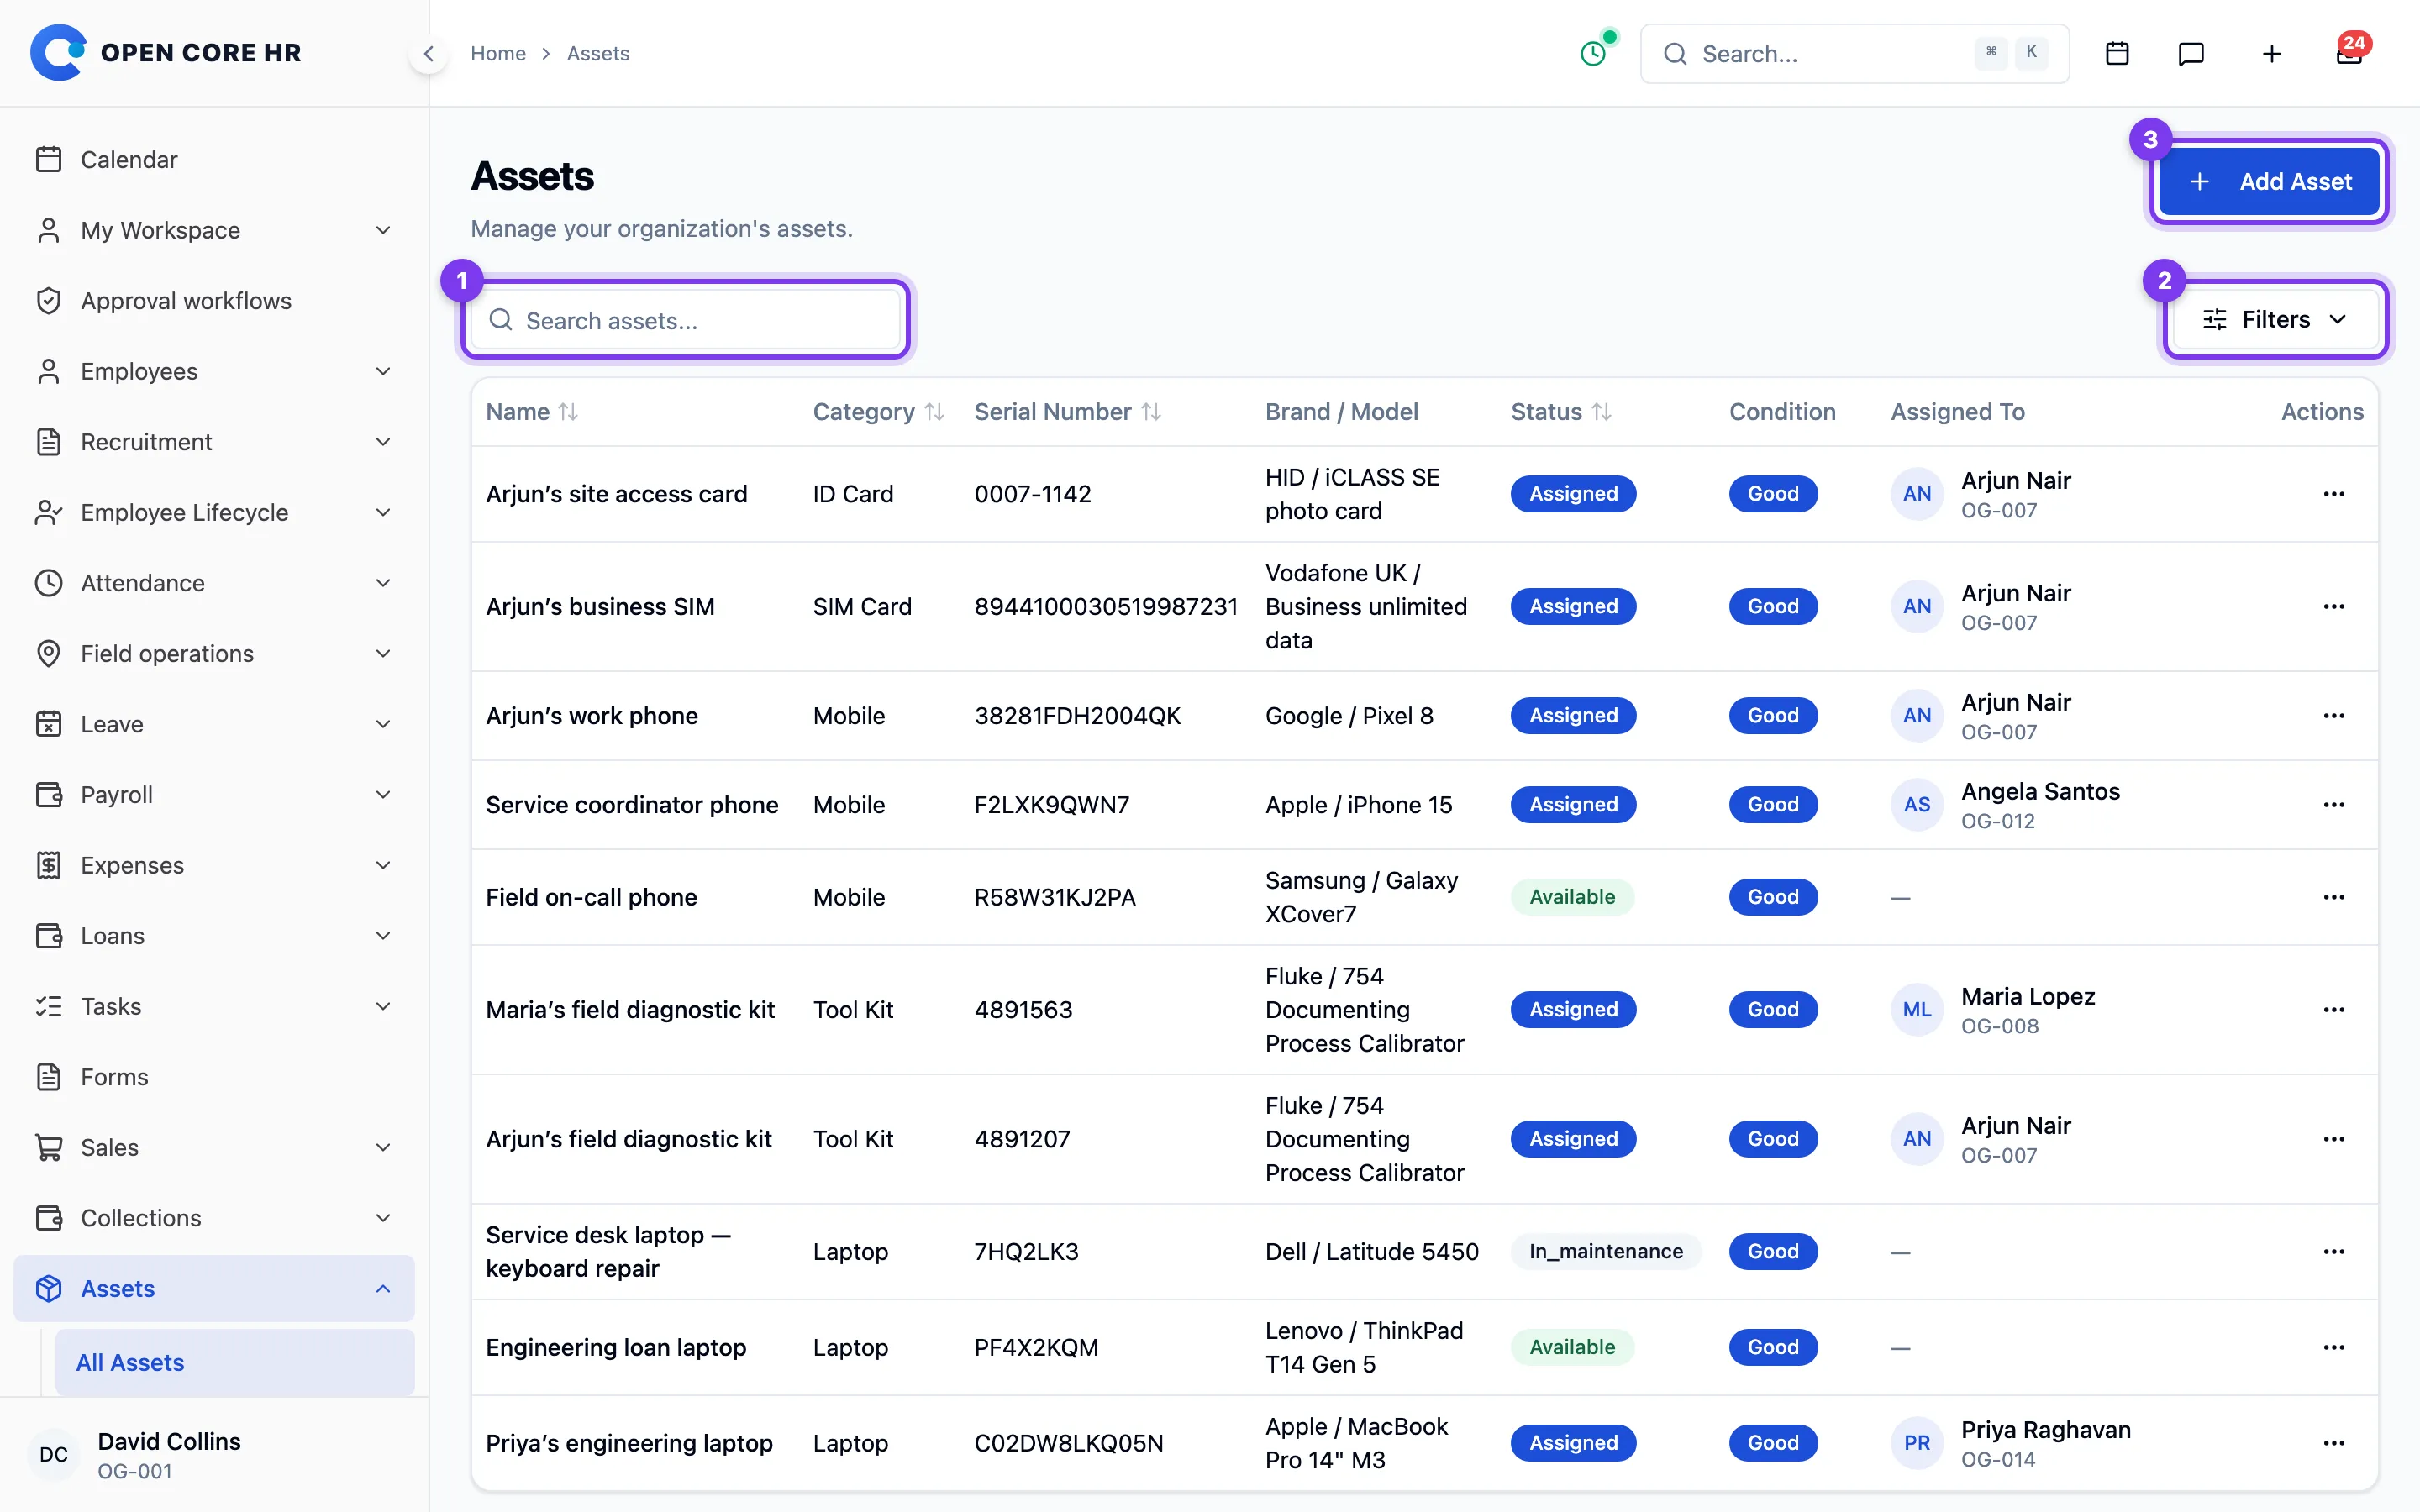
Checking availability
Check the status, condition, and current holder before assigning an asset. Status distinguishes assets that are Available, Assigned, in Maintenance, or Retired.
Tips
- The view (eye) action is always available; the edit and delete actions appear only if your role allows them.
- To see assets handed out to staff, open Asset Management → Assignments instead — see Asset assignments.
Adding an asset
Add a new asset to your inventory from the All Assets screen. A new asset starts with the status Available so you can assign it later.
Steps
- In the left menu, open Asset Management → All Assets.
- Click Add Asset at the top right. A panel slides in from the right.
- Choose a Category (required).
- Enter a Name (required).
- Fill in the optional details as needed:
- Serial Number
- Asset Tag
- Brand and Model
- Purchase Date and Purchase Price
- Warranty Expiry
- Condition — New, Good, Fair, Poor, Damaged, or None
- Notes
- If the chosen category supports accessories, an Accessories section appears. Click Add to include an item shipped with the asset, then fill in its Name (required), serial number, condition, and notes. Repeat for each accessory, or use the trash icon to remove one.
- Click Create to save the asset.
After you finish
The new asset appears in the All Assets list with the Available status and the condition you chose, if any.
Tips
- Serial Number and Asset Tag must be unique — if another asset already uses the same value, you'll see an error and the asset won't be saved.
- Purchase Price must be zero or a positive number.
- Accessories are only shown when the chosen category is set up to have them. You can also add or change accessories later from the asset's details page.
Troubleshooting
- "Category is required" / "Name is required" — fill in the highlighted field and try again.
- The save fails with a field error — read the message under the field, fix the value, and click Create again.
Bulk uploading assets
Import new asset records from Import & Export when you have many items to add. Asset Management must be enabled, and you need permission to create assets. Each file can contain at most 170 assets.
Steps
- Open Import & Export, choose Assets under imports, and download the current template.
- Replace the example row with one row per asset. Supply a name and an existing active category for every row. Category names are matched without case or surrounding-space differences; duplicate category names must be resolved first.
- Enter dates as
YYYY-MM-DDand prices as plain numbers, such as85000.00. Allowed statuses areavailable,in_maintenance,decommissionedandlost; allowed conditions arenew,good,fair,pooranddamaged. Record assignments separately after import. - Upload the file and validate it. Review the preview and any row errors. Correct errors and upload again; the whole file must pass validation before confirmation.
- Confirm the import and check History for its result. See Importing a spreadsheet for the shared workflow.
Tips
- Accessories are not part of bulk upload. Add them from each asset's details page after the import — see An asset's details.
- An import creates new assets. It does not update an asset with a matching serial number or tag. Resolve duplicate identifiers in the file or existing records before confirming.
Troubleshooting
- "Category '...' not found" — the category name in that row doesn't match any existing category. Create the category first (see Asset categories) or correct the spelling.
- A date or price error — make sure dates are written as YYYY-MM-DD and prices are plain numbers (for example, 85000.00).
- "Maximum 170 rows allowed" — split your data into smaller files and upload them one at a time.
- The import failed after validation — review its errors and existing assets before trying again. Another user may have created a matching asset or changed a category after your preview.
An asset's details
The asset details page shows everything about a single asset — its information, who currently holds it, its full history, maintenance records, documents, and an activity timeline. It's also where you assign, return, and maintain the asset.
Steps
- In the left menu, open Asset Management → All Assets.
- Find the asset and click the view (eye) action on its row.
- Review the sections on the page (described below).
- Use the buttons at the top right to act on the asset, if you have permission:
- Edit — change the asset's details.
- Assign Asset — hand the asset to an employee (shown when the asset is Available). See Assigning an asset.
- Return Asset — record the asset coming back (shown when the asset is Assigned). See Returning an asset.
- Add Maintenance — log a maintenance event. See Asset maintenance.
- Delete — permanently remove the asset.
Reviewing an asset
Check the current holder and condition, then review assignment and maintenance history when investigating damage or arranging a handover. Supporting files are available under Documents; the Activity Timeline records assignments, returns, maintenance and other changes.
Tips
- The action buttons that appear depend on both the asset's current status and your permissions.
- The Edit button opens the same edit panel used on the All Assets screen.
Troubleshooting
- The page doesn't load — go back to Asset Management → All Assets and open the asset again; it may have been deleted.
Asset categories
Categories group your assets — for example, Laptops, Phones, or Furniture. Every asset belongs to a category. Open Asset Management → Categories to manage them.
Steps
View categories
- In the left menu, open Asset Management → Categories.
- Use the Search categories... box to find a category by name, slug, or description.
- Click the Name or Slug column header to sort.
Add a category
- Click Add Category at the top right. A panel slides in from the right.
- Enter a Name (required).
- Optionally enter a Slug — leave it blank to have one generated automatically.
- Turn on Has Accessories if assets in this category come with accessories you want to track.
- Optionally add a Description.
- Click Create.
Edit a category
- Click the edit (pencil) action on the category's row.
- Update the fields in the panel.
- Click Update.
Delete a category
- Click the delete (trash) action on the category's row.
- Confirm by clicking Delete.
Checking category usage
Check the asset count before changing or removing a category. Has Accessories indicates whether assets in the category can include accessories.
Tips
- Turning on Has Accessories makes the Accessories section appear when adding or editing an asset in that category.
- A category's Asset Count helps you see which categories are in use before deleting one.
Troubleshooting
- The delete fails — a category that still has assets may not be removable. Move or remove its assets first, then try again.
Asset assignments
The Assignments screen shows who has which asset — every current and past hand-out across your organization. Open Asset Management → Assignments to see it.
Steps
- In the left menu, open Asset Management → Assignments.
- Use the Search assignments... box to find an assignment by asset name, serial number, category, or employee name or code.
- Use the All Statuses dropdown to show only assignments with a given status.
- Click a column header (Asset Name, Category, Assigned At, Status) to sort.
Checking an assignment
Check the recipient, handover date, condition, and status. Assignments take effect immediately. Active means the employee currently holds the asset; Returned means the assignment has ended.
Tips
- To assign a new asset or record a return, open the asset's details page (see An asset's details) and use the Assign Asset or Return Asset button there.
- An Active assignment is the one the employee currently holds; Returned assignments are completed.
Troubleshooting
- An assignment isn't listed — clear the Search box and reset the All Statuses filter, then look again.
Assigning an asset
Hand an asset to an employee from the asset's details page. The assignment takes effect immediately and the asset moves to the Assigned status.
Steps
- In the left menu, open Asset Management → All Assets.
- Find the asset (it must be Available) and click the view (eye) action to open its details.
- Click Assign Asset at the top right. A panel slides in from the right.
- Choose the Employee to assign the asset to (required).
- Set the Condition at Assignment — New, Good, Fair, Poor, or Damaged.
- Optionally add Notes about the hand-over.
- Click Assign Asset.
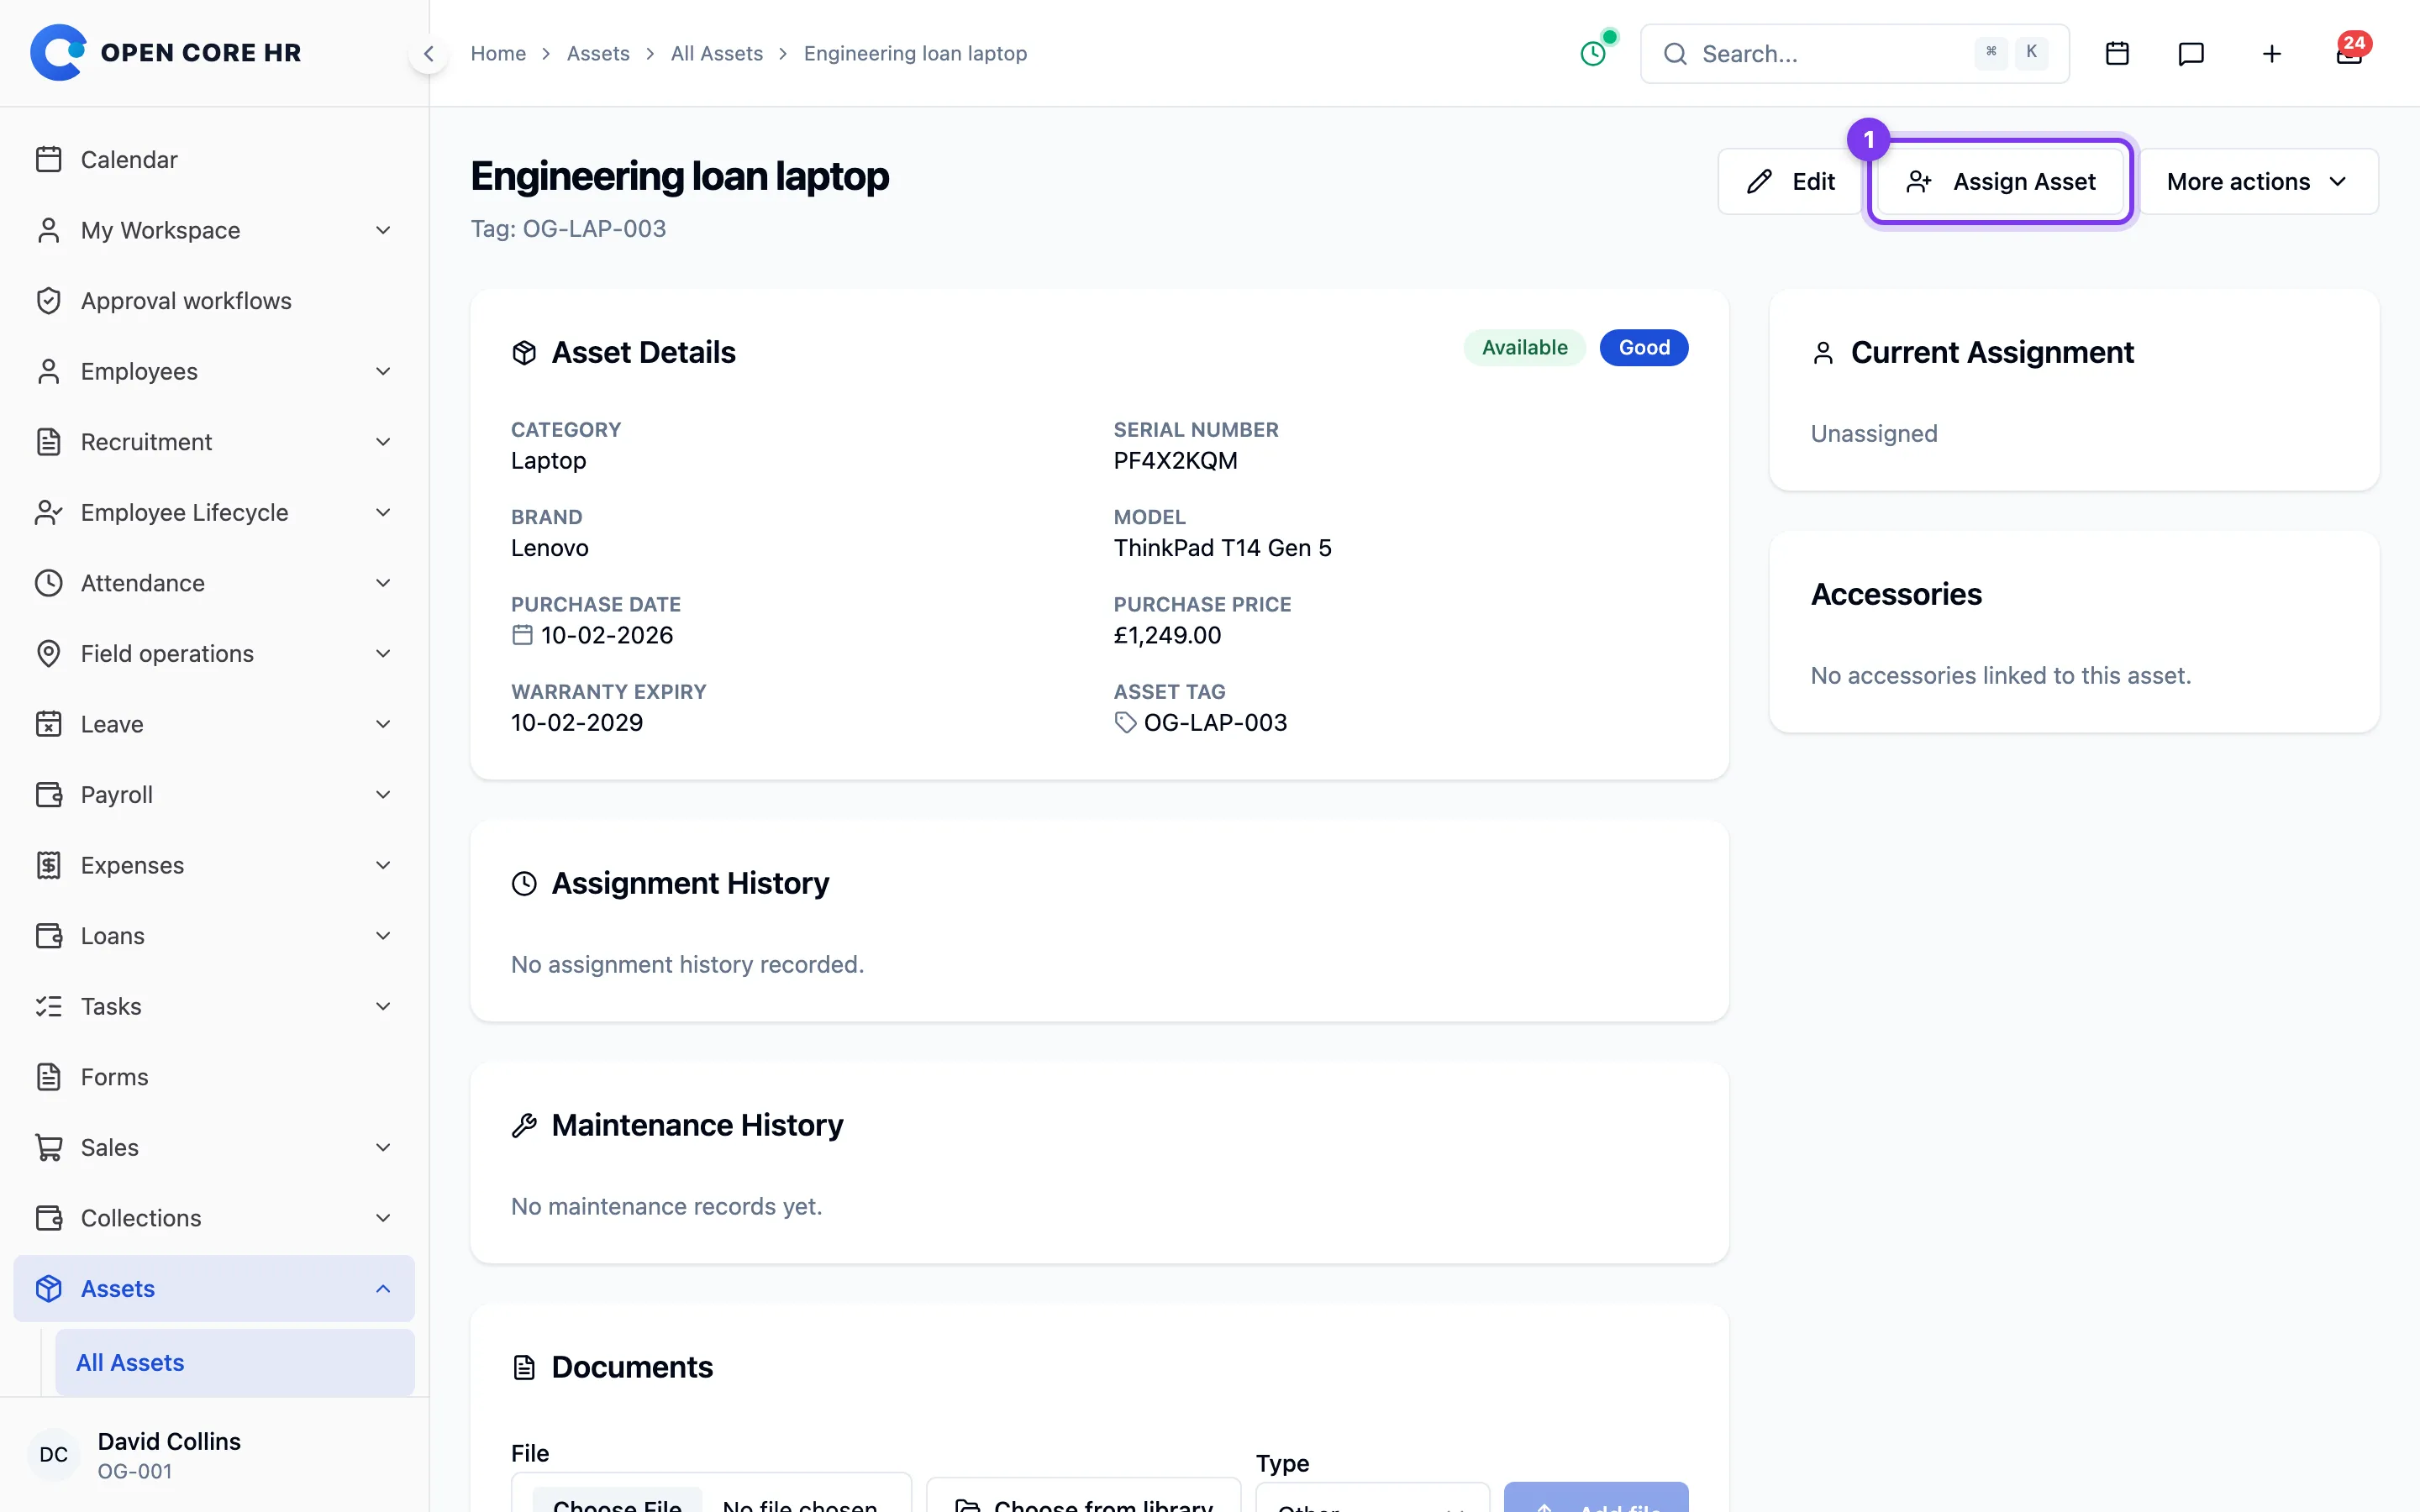
After you finish
The asset's status changes to Assigned, the employee appears under Current Assignment, and a new entry is added to Assignment History and the Activity Timeline.
Tips
- The Assign Asset button only appears when the asset is Available and has no assignment in progress.
- To hand the asset back later, use Return Asset on the same page — see Returning an asset.
Troubleshooting
- "Select an employee" — you must pick an employee before you can assign the asset.
- The assignment is rejected — the asset may no longer be available (someone else may have assigned it). Reopen the asset's details to check its current status.
Returning an asset
When an employee hands an asset back, record the return from the asset's details page. The asset then moves back to the Available status so it can be assigned again.
Steps
- In the left menu, open Asset Management → All Assets.
- Find the asset (it must be Assigned) and click the view (eye) action to open its details.
- Click Return Asset at the top right. A panel slides in from the right.
- Set the Return Date (required) — it defaults to today.
- Set the Condition on Return (required) — New, Good, Fair, Poor, or Damaged.
- Optionally add Notes with any remarks about the return.
- Click Confirm Return.
After you finish
The asset's status changes to Available, the Current Assignment clears, and the assignment is closed out in Assignment History with the return date and condition. The return is also added to the Activity Timeline.
Tips
- The Return Asset button only appears when the asset is currently Assigned.
- Logging maintenance with the asset status set to Available also returns the current assignment automatically — see Asset maintenance.
Troubleshooting
- The return fails — the assignment may no longer be active (it may already have been returned). Reopen the asset's details to check its current status.
Note: The details page records a return in a single action — there is no separate return-request step to approve first.
Asset maintenance
Record repairs, servicing, and inspections against an asset so you have a full maintenance history. You can also change the asset's status as part of logging maintenance.
Steps
View maintenance history
- In the left menu, open Asset Management → All Assets.
- Open the asset's details (the view / eye action).
- Scroll to the Maintenance History card. Each record shows the date performed, type, description, cost, vendor, next due date, who logged it, and notes.
Log a maintenance event
- On the asset's details page, click Add Maintenance at the top right. A panel slides in from the right.
- Set the Performed On date (required) — it defaults to today.
- Choose the Type — Preventive or Corrective.
- Enter a Description (required) of the work done.
- Optionally enter the Cost and the Vendor.
- Optionally set a Next Due Date for the next service (it must be on or after the Performed On date).
- Optionally add Notes.
- If the asset's status should change after this maintenance, turn on Update asset status after maintenance? and choose the New Asset Status — Available, Assigned, In Maintenance, Decommissioned, or Lost.
- Click Save Maintenance.
After you finish
The new record appears at the top of Maintenance History, and the event is added to the Activity Timeline. If you changed the asset's status, the Asset Details card updates to show it.
Tips
- If you set the new asset status to Available while the asset is currently Assigned, the current assignment is automatically returned.
Troubleshooting
- "Description is required" — enter what was done before saving.
- The next due date is rejected — it must be the same as, or later than, the Performed On date.
Asset documents
Attach files to an asset — purchase invoices, warranty certificates, manuals, and more — so they're kept alongside the asset record.
Steps
View documents
- In the left menu, open Asset Management → All Assets.
- Open the asset's details (the view / eye action).
- Scroll to the Documents card. Each file shows its name, type, and size. Click a file name to open it in a new tab.
Upload a document
- On the asset's details page, in the Documents card, click the File picker and choose a file.
- Choose a Type — Invoice, Warranty, Manual, or Other.
- Click Upload.
Delete a document
- In the Documents card, click the delete (trash) action next to the file.
- Confirm by clicking Delete. The file is permanently removed.
After you finish
The uploaded file appears in the Documents list, and the upload is added to the Activity Timeline.
Tips
- You can upload PDF, JPG, PNG, Word, and Excel files, up to 10 MB each.
- The upload and delete controls only appear if you have permission to manage asset documents.
Troubleshooting
- The upload is rejected — check the file type and that it's under the size limit, then try again.
- "Pick a file to upload" — choose a file in the File picker before clicking Upload.
Your assets (employees)
The My Assets screen in the Documents module lists the company assets currently assigned to you.
Checking your equipment
Open an asset to check its serial number, assignment date, and included accessories. Confirm these details when receiving or returning equipment.
Steps
- Open My Assets from the module menu.
- Use the search box to find an asset by name.
- Click the eye icon in the Actions column to open the details panel, which shows the Serial Number, Asset Tag, Brand, Model, Assigned Date, Condition When Assigned, Assignment Notes, and a list of Accessories.
Tips
- The details panel also lists documents attached to the asset and its maintenance history — see An asset's documents and An asset's maintenance history.
Your asset's documents
Each asset assigned to you can have documents attached, such as a warranty card or handover form. You view them inside the asset's details panel.
Steps
- Open My Assets from the module menu.
- Click the eye icon next to the asset. The details panel slides in from the right.
- Scroll to the Documents section.
- For any document with a View link, click it to open the file in a new browser tab.
Tips
- Documents here are managed by your IT or admin team — you can view them but not upload to an asset from this screen.
Your asset's maintenance history
If an asset assigned to you has been serviced or repaired, those records appear in the asset's details panel.
Steps
- Open My Assets from the module menu.
- Click the eye icon next to the asset. The details panel slides in from the right.
- Scroll to the Maintenance Log section.
Reviewing maintenance
Check what work was performed and the next due date, if recorded, before arranging further maintenance.
Tips
- Maintenance records are added by your IT or admin team; this screen is read-only.