
All guidesAdd-on modules
Employee lifecycle
Manage recruitment, offers, onboarding, probation, employment changes, separations and final settlements.
Use Employee Lifecycle for joining arrangements, employment changes, and exits. The module must be enabled and your permissions must allow the action you want to take.
Start with the path your organisation needs. Add an employee directly for an existing or confirmed hire. Use recruitment when you need to advertise a job or track candidates. An offer, interviews, and probation are optional; there is no mandatory chain for every hire.
An employee's profile holds their current work information and compensation. Lifecycle records explain the changes: offers and onboarding, optional probation, promotions or other employment changes, and separation. Account access is managed separately from employment progress.
Joining and exit tasks share one task list and track the practical work around a hire or an exit. Tasks marked required must be completed or waived before onboarding is completed or employment is ended; optional tasks never block. Set the default tasks once under Settings → Joining and exit tasks.
For an exit, record the last working date and assign practical handover tasks. HR ends employment once the required tasks are done, independently of any payment record. Prepare an optional settlement only when there are amounts to record.
Use Disciplinary Actions for employee warnings. Employment letters and the timeline provide supporting records.
Choosing a recruitment path
Recruitment helps HR manage jobs, applicants, and interviews before an offer. Employee Lifecycle must be enabled. Viewing applicants, conducting interviews, creating offers, and downloading candidate documents are separate permissions.
Choose the shortest path that fits the hire:
- Add an employee directly when the hiring decision is already made and no offer record is needed.
- Add an applicant for a referral or other candidate, with or without a job posting.
- Publish a job when people should apply through your public careers page.
Interviews are optional records attached to an applicant. You can create an offer for an open applicant without completing a fixed series of interview rounds. An offer records the proposed employment terms; the candidate becomes an employee through the joining process.
Keep notes relevant to the hiring decision. Candidate contact information and CVs belong to the recruitment record; they are not colleague-directory entries.
Publishing a job
Create a job when you want candidates to apply through the public careers page. You need permission to manage job postings. A super admin connects the website using Careers integration.
- Open Job Postings and create a draft with a clear title and description.
- Add the internal designation, department, and location if they are already known. They are optional during recruitment.
- Add a pay range only if you want to record one. Include the currency and hourly, daily, weekly, monthly, or yearly pay period so candidates can interpret it correctly.
- Review the opening count and any closing date, then publish when you are ready to accept applications.
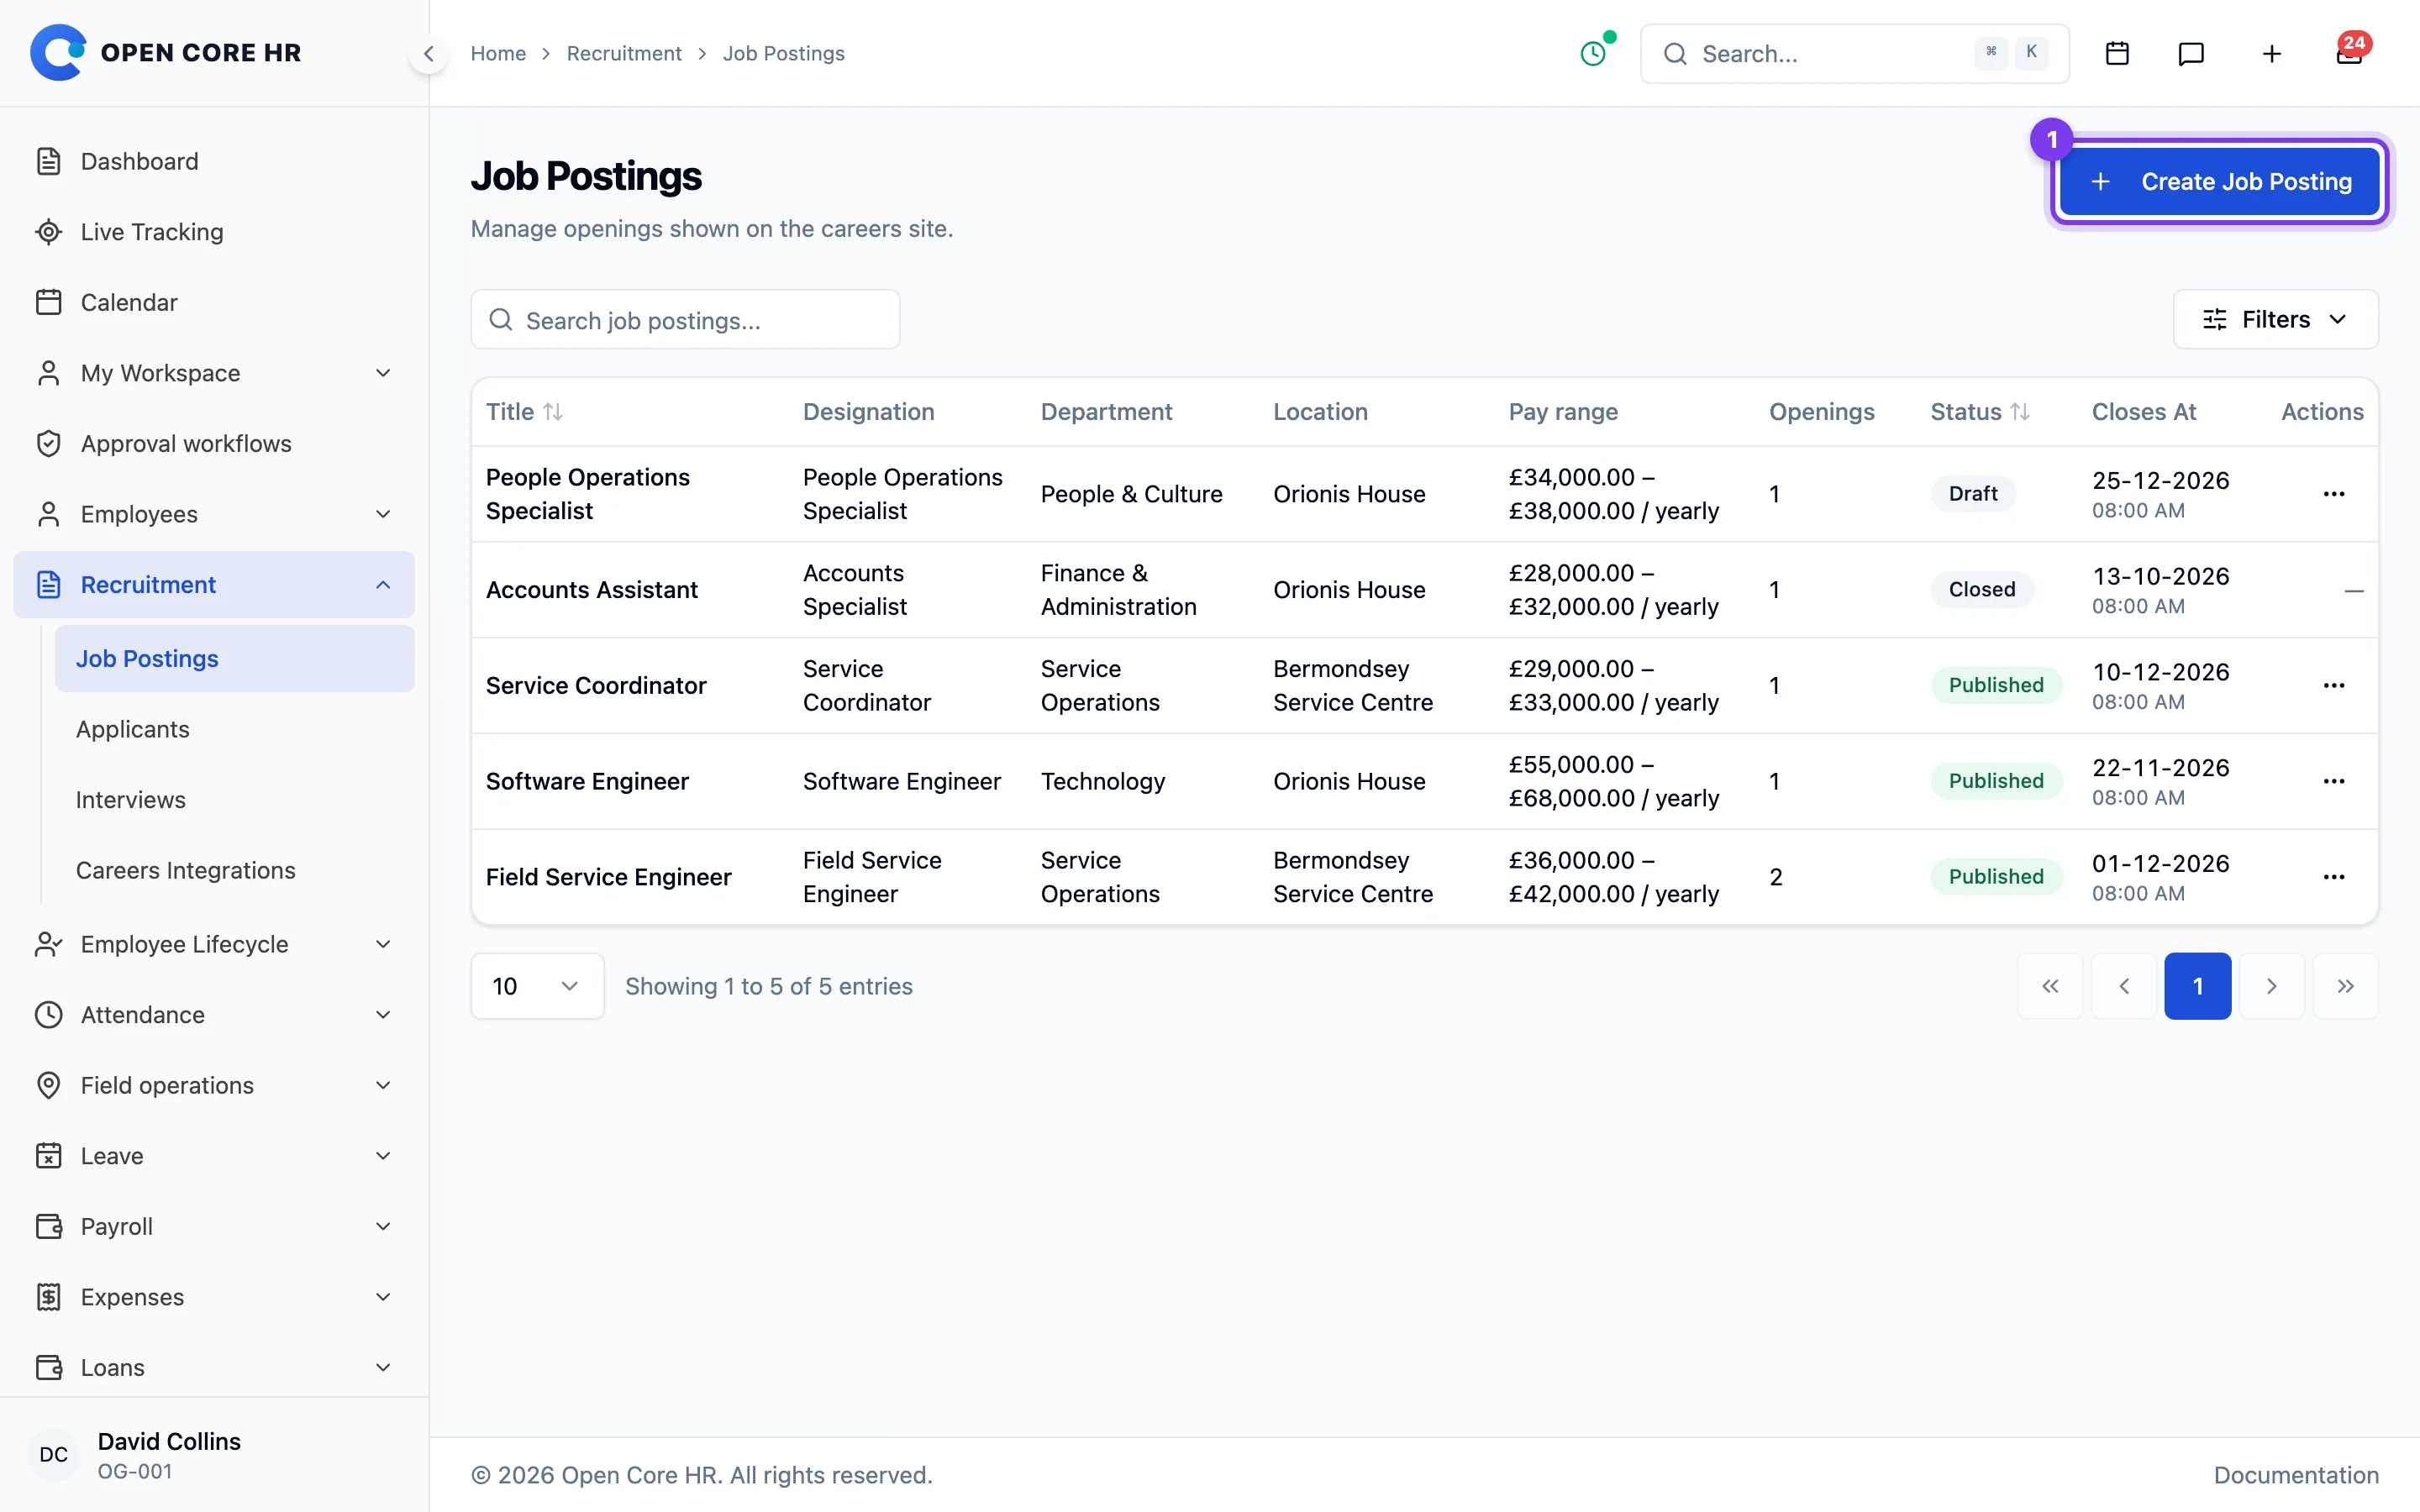
Draft and closed jobs do not accept public applications. Close a job when hiring stops; existing applicants and interviews remain available for follow-up. If a candidate cannot apply, check that the job is published and its closing date has not passed.
Public applications require the applicant's name and email. Phone, current location, a message, and CV are optional. Review new submissions in Applicants.
Managing applicants
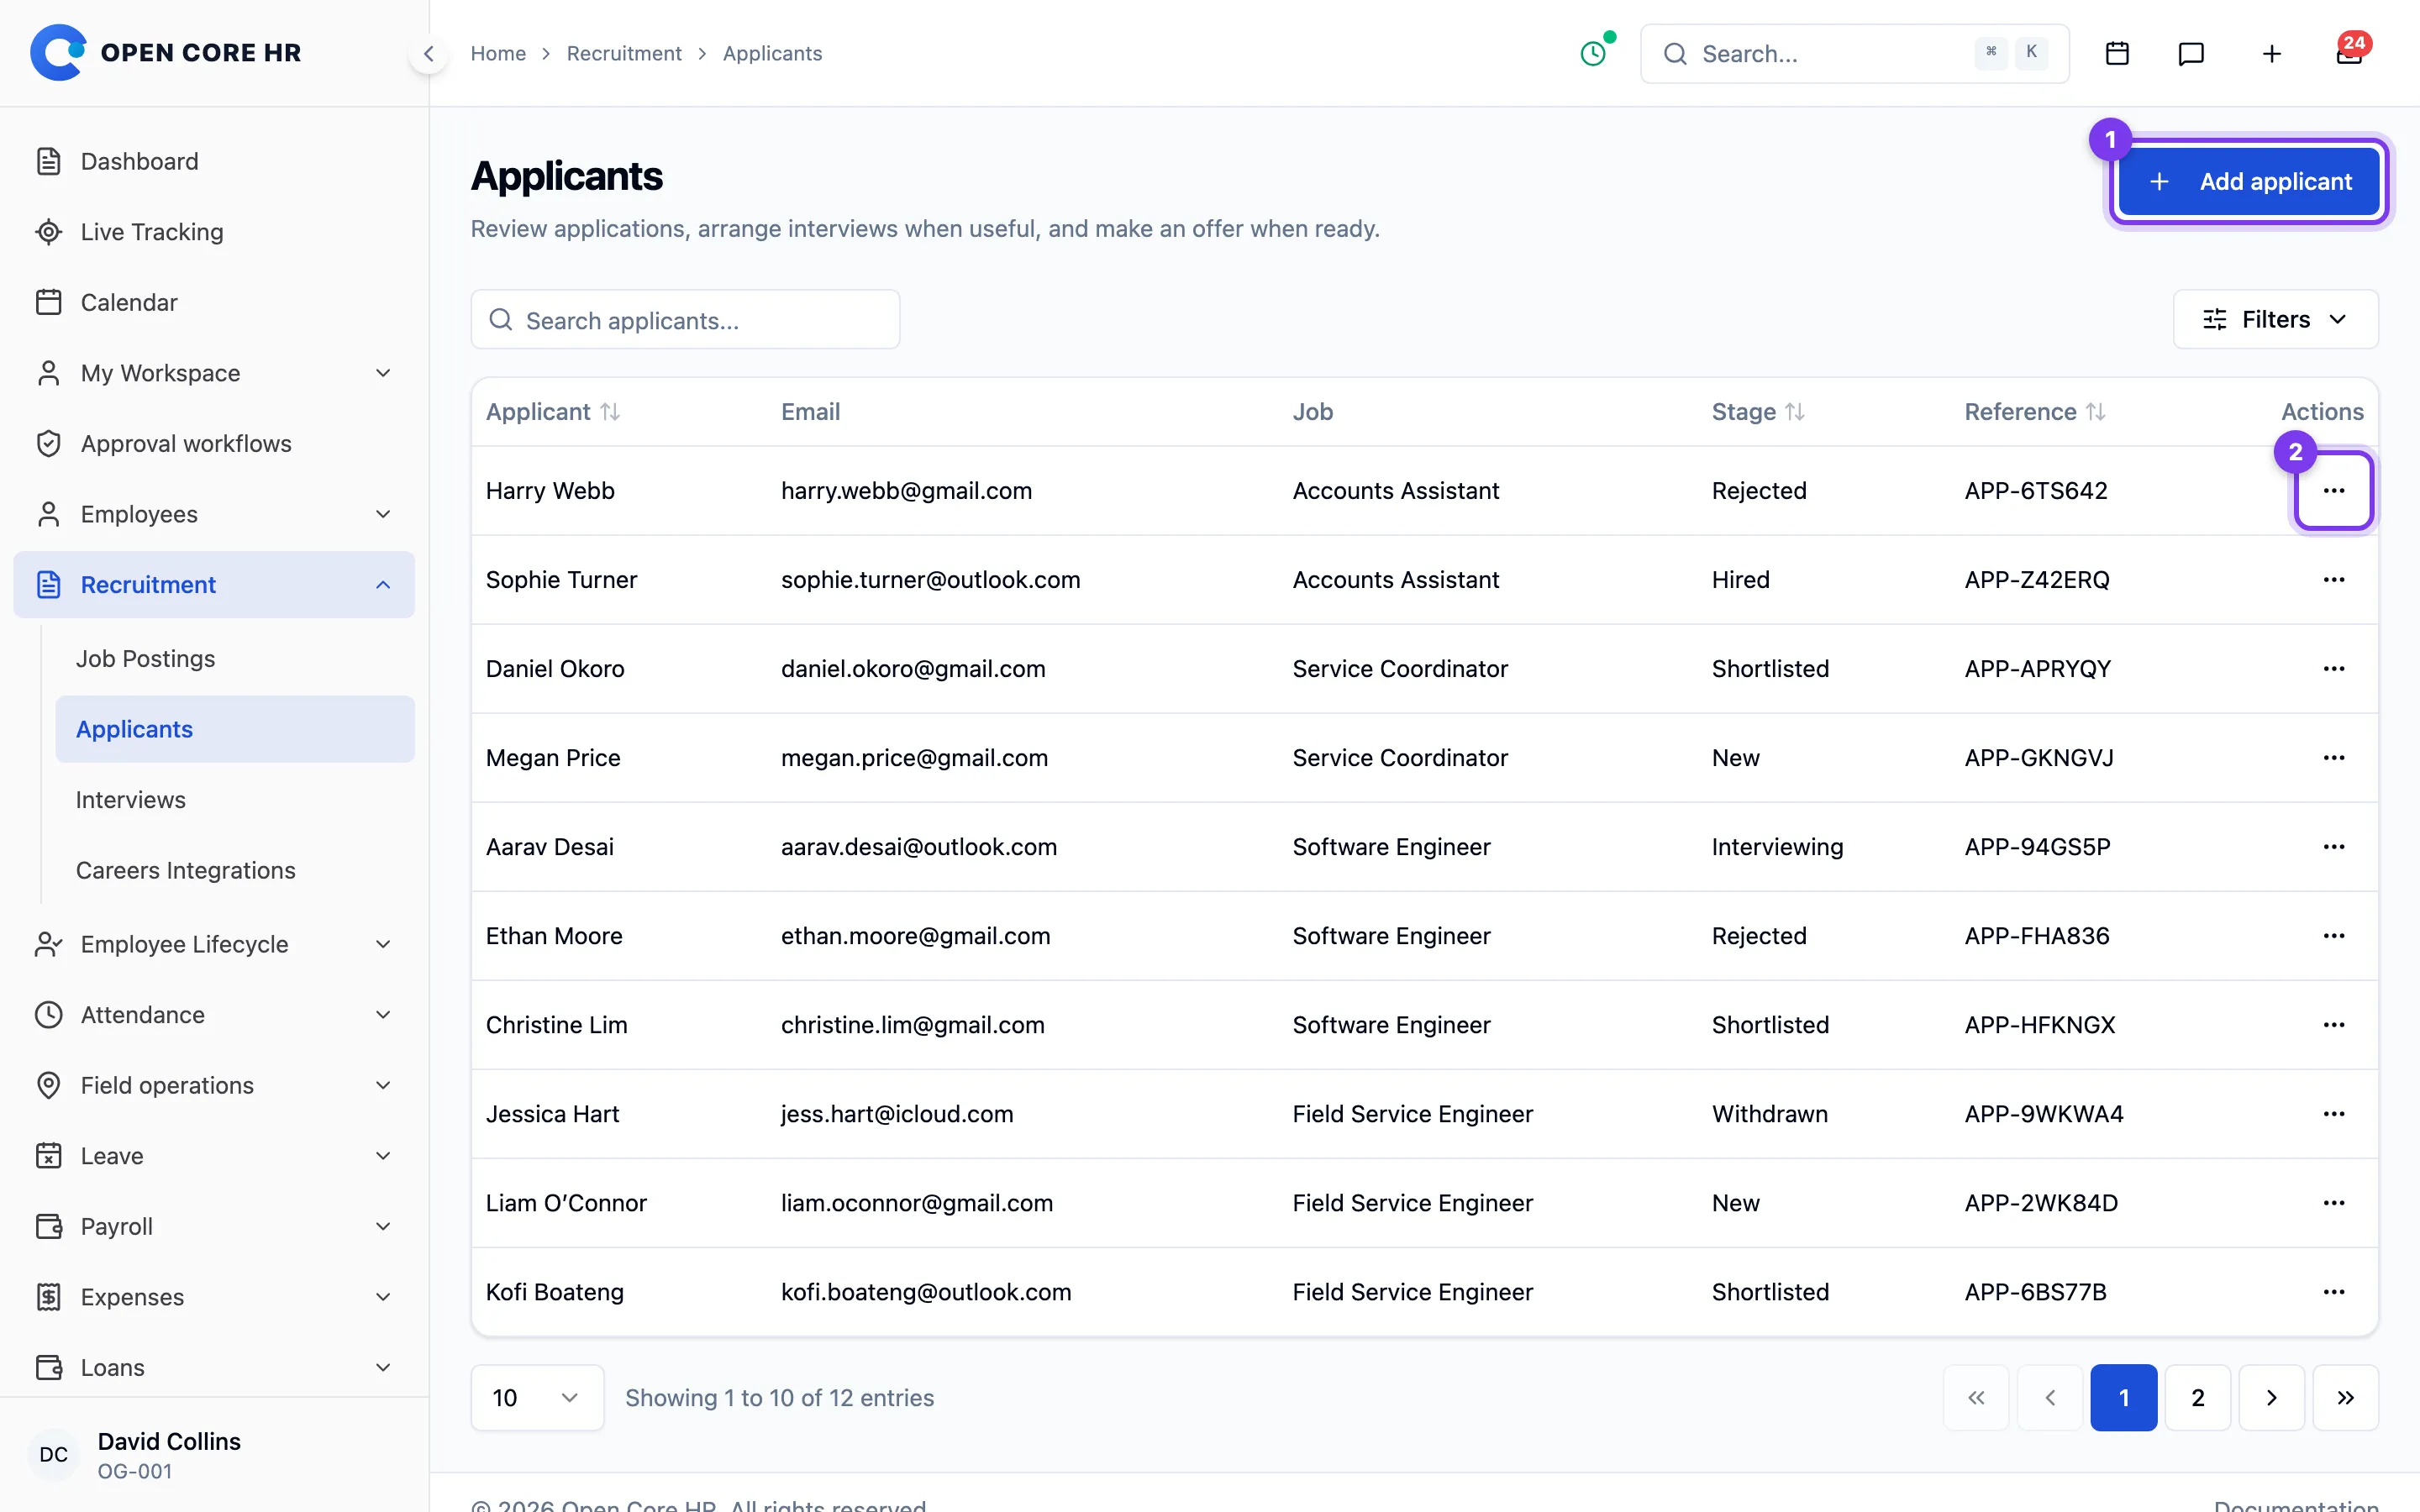
Use Applicants for public applications, referrals, and candidates added by HR. Name and email are required; a linked job, phone, current location, message, and CV are optional for an applicant added internally.
Review the candidate's relevant experience in their CV or notes. Download a CV only when your permissions allow it. The application form does not require family details, date of birth, gender, or a previous salary slip.
Applicants progress through New, Shortlisted, Interviewing, Offered, and Hired as work is recorded. Rejected and Withdrawn close an application without hiring. Shortlist a candidate when you want to continue; reject when your organisation decides not to proceed, or withdraw when the candidate leaves the process.
You can schedule an interview when an assessment is useful. An interview is optional: an open applicant can move directly to an offer if you have permission to create one. Before making an offer, check for another offer already in progress so the candidate does not receive conflicting terms.
Hiring links the applicant to an employee record. Use that record for employment and access management after the handoff.
Scheduling and recording interviews
Interviews are optional assessments attached to an applicant. Each interview has an assigned interviewer, type, and scheduled time; there are no mandatory interview templates or round counts.
- Open the applicant and schedule an interview with an interviewer and date/time. Include a meeting link or location instructions where appropriate.
- Confirm the arrangements with the candidate through your organisation's usual communication process.
- After the interview, the assigned interviewer records notes and a passed or failed outcome. A numeric score is optional.
Reschedule when the time changes, mark a no-show when the interview did not happen, or cancel an interview that is no longer needed. A completed assessment records the interviewer's decision; HR still makes the separate decision to offer, reject, or continue assessing the applicant.
An assigned interviewer can use My Interviews to find their interviews. Applicant documents remain subject to document-download permission. If you cannot record a result, confirm that you are the assigned interviewer and that the interview is still open.
Careers integration
Connect your careers website to published jobs and candidate applications. This requires Employee Lifecycle and a super admin. Open Recruitment → Careers Integrations to manage each website's credentials separately.
Set up a website connection
- Create a client with a recognizable name, unique code and optional contact email and description.
- Select only the capabilities the website needs:
- Read published jobs (
careers:read) — list and display vacancies. - Submit applications (
applications:write) — submit applications and check whether a candidate is eligible to apply again. - Read application status (
applications:read) — provide the supported candidate-status lookup.
- Read published jobs (
- Leave the client active, save it and open its token controls.
- Give the token a name and select its capabilities, then generate it and copy it immediately. The complete token is shown once.
- Give it to the developer configuring the careers website. Store it on that website's server, never in browser JavaScript or a public repository.
The website calls /api/v1/external/careers with the token as an
Authorization: Bearer header. Your developer should use the integration routes
for published postings, applications, eligibility and candidate status. The
website does not receive access to employee records, the administration portal
or webhook configuration.
Change or revoke access
A token can use only capabilities allowed by both the token and its client. Removing a client's capability revokes every token that included that capability, including the token's other access. Generate a replacement with the remaining capabilities and update the website's configuration. New clients default to reading published jobs; explicitly select application capabilities when needed.
Deactivate a client to pause all its tokens. Revoke an individual token if it is lost or exposed, or delete the client to revoke all its tokens. Create a replacement before removing the website's current token when avoiding downtime matters. Disabling Employee Lifecycle also disables this integration.
Resolve connection problems
- Unauthenticated: check that the server sends a valid, unexpired token. Revoked tokens must be replaced.
- Access denied: check that the client is active and both it and its token allow the requested capability.
- Too many requests: reduce the website's request frequency and retry after the server's rate-limit interval.
- No vacancies: confirm the jobs are published and available to candidates; the website cannot retrieve unpublished recruitment records.
Application tracking links
Applicants receive a confirmation email with a link to track their application on your careers website. Enter the website's address in Settings → Recruitment → Careers website address. Without it, the confirmation email shows the reference number but no tracking link.
The same tab sets when unanswered interview outcomes are reported as missed and how many days before a probation period ends managers and HR are reminded.
Managing employment offers
Use Offers when you need to record proposed employment terms and obtain a candidate's response. An offer is optional for a direct hire.
A Draft can be edited before it is sent. Sent means the candidate has a secure link to review the terms. They can accept or decline before the expiry date. Accepted, Declined, Expired, and Revoked describe the outcome; acceptance is separate from completing employment onboarding.
Before sending or resending an offer, check the candidate's email, joining date, work assignment, and any pay terms. Revoke an open offer if its terms should no longer be accepted. To replace terms after a response, use your organisation's agreed HR process rather than changing an accepted document without review.
Acceptance creates or links the employee record, sends an account invitation, and starts a standalone onboarding record. Follow up in Onboarding.
Creating and sending an offer
You need permission to create offer letters. Start from an open applicant when recruitment already has the candidate's details, or create an offer directly in Offers.
- Check the candidate's name and email and enter the planned joining date.
- Add the designation, department, location, and reporting manager where known.
- Record an optional agreed pay amount with its currency and pay period. Leave pay blank if it is not part of this offer record.
- Add an expiry date, probation end date, notice period in days, and terms only where they apply.
- Save the draft, review it, then choose Send offer.
The candidate receives a secure link to accept or decline. The link is for that decision; private personal, emergency, and bank details are maintained later in the employee's profile.
Accepting the offer sends a separate invitation to set a password and starts onboarding. Probation is created only if an end date was supplied.
Completing onboarding
Onboarding is a standalone record for an employee who is joining. It can begin from an accepted offer or a direct hire; you do not need a recruitment application or offer for every employee.
You need Manage onboarding access to start, review, or complete these records. Offer-letter permissions are separate.
- Open Onboarding and select an existing record, or start onboarding for an employee. The default joining tasks are added automatically.
- Check the joining date and add a probation end date only if probation applies.
- Open the record to review its tasks. Add any further tasks, assign each to a responsible person, and choose whether it must be done before completion. Assignees complete their work through Assigned joining and exit tasks; you can also mark a task Completed, or Waived when it does not apply.
- Review the employee's profile and the required documents. Request corrections through the document process when a file is missing or unsuitable.
- Choose Complete onboarding when every required task is completed or waived.
Required tasks that are still pending block completion; optional tasks do not. Outstanding documents don't block completion; follow them up through the document process. Personal details, bank details, compensation, and appointment letters are optional.
Completion marks employment as Employed. If a probation end date was provided, it creates a probation review. Account access still depends on the separate invitation and account status; completing onboarding does not set or reveal a password.
Appointment letters
An appointment letter records employment terms for an employee. It is optional and does not determine whether onboarding or account access is complete.
Use Appointments to find an existing letter or issue one when your organisation needs it. Check the employee, effective date, work terms, and content before sharing it. See Issuing an appointment letter.
Issuing an appointment letter
An appointment letter is an optional document for an existing employee. Creating the draft and issuing it require the relevant appointment permissions.
- Open Appointment letters and create a record for the employee.
- Enter working hours and agreed terms where needed, then save the draft.
- Review the employee and terms. A user with permission to issue the letter selects Issue letter.
- Use the employee's letters to view or download the issued document.
Issuing a letter does not complete onboarding, confirm probation, change compensation, or enable account access. Manage those decisions in their own records.
Tracking optional probation
Use Probations for employees whose joining terms include a probation period. A review is created during onboarding completion only when an explicit probation end date was supplied.
Review the end date before deciding to extend or confirm the employee. Ongoing is the original review period, Extended means a new end date has been recorded, and Confirmed means the confirmation workflow has finished.
Probation does not disable sign-in or change the employee's account status. Follow Managing probation to record a decision.
Managing probation
Use Probations when an employee has an explicit probation end date. You need permission to manage probation to extend or submit a confirmation.
To extend a review, record the new end date and the reason. Check the agreed terms with the employee before making the change. The record keeps the original and extended end dates.
To confirm completion of probation, choose Confirm and submit through the configured confirmation workflow. When approval completes, the review becomes Confirmed. If no approval workflow is configured, the permitted confirmation is completed directly.
Confirmation records the probation decision. It does not change account access, calculate pay, or require an appointment letter.
Tracking employment changes
Use Employment changes to record a promotion, transfer, pay change, or another agreed change. Each record preserves the previous terms and the proposed values with an effective date.
Check the employee, changed fields, date, and approval state. An approved future change is applied when its effective date arrives. Approval and application are separate events, so check the employee's current profile before assuming a future change is already in force.
See Creating an employment change. Current compensation and its history remain available from the employee profile independently of the Lifecycle module.
Creating an employment change
You need permission to create employment changes. Open Employment changes, select the employee, and choose Promotion, Transfer, Pay change, or Other.
- Set the effective date and a useful reason.
- Enter only the terms that should change: designation, department, location, manager, or pay. Leaving an unrelated field blank keeps its existing value.
- For a pay change, record the amount, currency, and pay period together.
- Save the draft and review the previous and proposed terms, then choose Submit change.
The configured approval workflow is used when available. If none is configured, submission records approval directly. Future approved changes wait for their effective date before changing the employee's current terms.
This records employment terms and compensation history. It does not calculate payroll or produce a payslip.
Tracking employee exits
A separation records why employment is ending and the last working date. Use Separations to find an exit in progress or review a completed one.
Review the employee, exit type, last working date, and approval status before taking action. Exit tasks track assigned handover work; an optional settlement records amounts. Neither changes the last working date automatically.
Ending employment requires every required exit task to be completed or waived. HR chooses separately whether to disable account access. Optional tasks and unpaid settlement records can remain open after employment ends, so continue following them up from the separation and settlement records.
See Managing a separation for the process and Recording a final settlement for payments.
Managing a separation
Record an exit when an employee resigns or your organisation ends their employment. You need permission to manage separations; your organisation's approval workflow may also apply.
- Open Separations, select the employee, and record the exit type, resignation or notice date, last working date, and reason. The default exit tasks are added automatically.
- Submit the record for approval when required. Address rejection notes before resubmitting.
- Open the record and add any further tasks for the actual work needed, such as returning equipment, transferring responsibilities, or reviewing access. Assign each task to a responsible person and choose whether it must be done before completion.
- Assignees complete their work through Assigned joining and exit tasks. HR can record Completed, or Waived when the task does not apply.
- When every required task is completed or waived and the last working date has been reached, choose End employment and explicitly decide whether account access should be disabled.
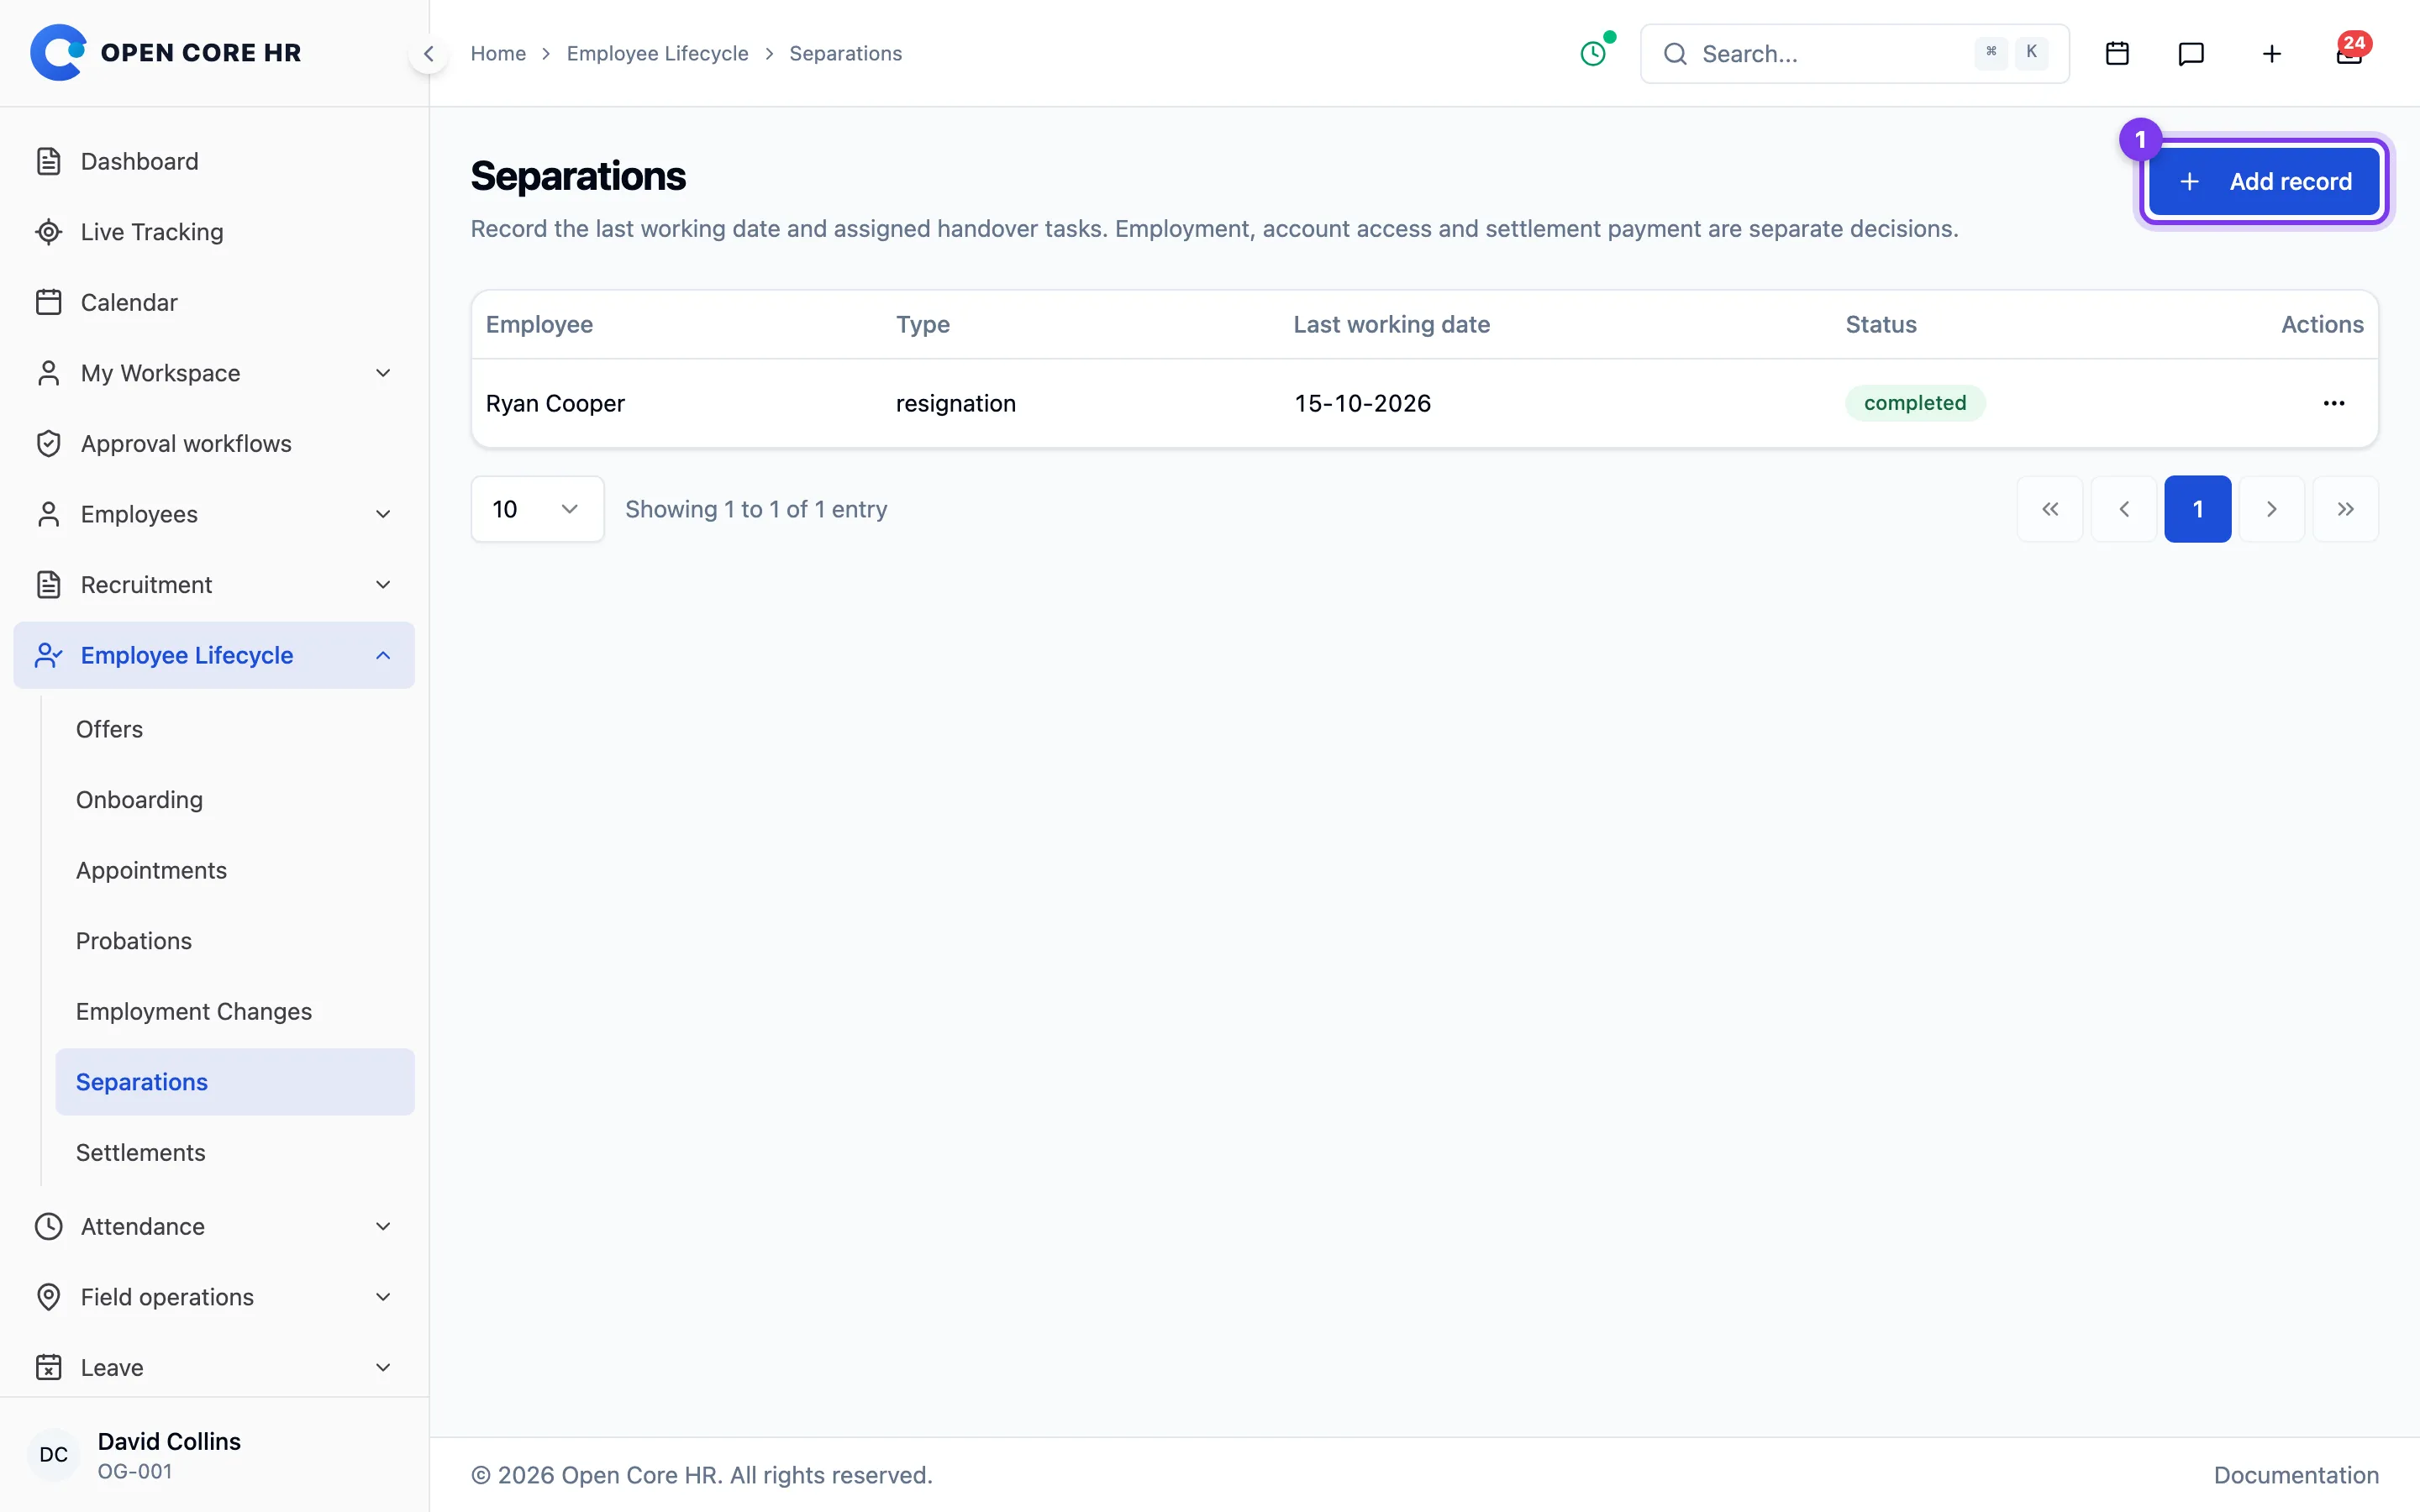
Ending employment marks it as Ended. Required tasks that are still pending block this step; optional tasks do not. A settlement does not have to be paid first.
If money remains to be recorded, create an optional settlement. Do not change the employment end date merely to wait for a payment.
Tracking final settlements
A settlement is an optional payment record associated with an employee's separation. Use it when there are agreed additions or deductions to record at exit.
Check the currency, each line's meaning, the net amount, approval progress, and payment date. Amounts are entered and reviewed by authorised staff. The system totals the lines; it does not calculate payroll, tax, gratuity, leave encashment, or other statutory entitlements for you.
Employment completion and settlement payment are independent. An employee can have ended employment while a settlement is still being reviewed or remains unpaid. See Recording a final settlement.
Recording a final settlement
Create a settlement only when there are exit-related amounts to record. You need permission to manage settlements and a separation record for the employee.
- Select the separation, currency and calculation mode.
- Add a clear label and amount for each Addition or Deduction. Use the amounts your authorised payroll or finance process has established.
- Check the net total and supporting notes before submitting for approval.
- Resolve any review comments before payment.
- For a Full settlement, mark it paid only after payment has actually been made and record the payment details. For Payroll adjustments, link it to Payroll and record payment there.
Choose Payroll adjustments when Payroll calculates the employee's final salary. Enter only additional exit amounts; exclude salary and anything already included in payroll, such as an integrated loan repayment. Complete the separation and approve the adjustments before linking them to the employee's final pay run. The separation's last working date must be within that payroll period.
Choose Full settlement when an external process has established the whole settlement and you will record its payment here. These records cannot be added to Payroll salary. Calculation mode can change only while the settlement is a draft; check it before approval.
Loans, bonuses, and other balances are not automatically imported into this record. Check the relevant source records before entering a line so an amount is not omitted or counted twice.
The payment record does not complete the employee's separation or disable their account. Manage those decisions from the separation.
Checking your employment changes
Open My employment changes to review promotions, transfers, pay changes, or other recorded changes to your employment. Employee Lifecycle must be enabled.
Compare the previous and new terms, effective date, reason, and approval state. An approved future change may not yet appear as your current work assignment or compensation. Ask HR about any discrepancy before the effective date where possible.
Your profile contains current agreed compensation and its history. These records describe agreed terms; payroll payments are handled separately.
Your probation
This page shows your probation reviews and confirmation status. Open it from My Workspace > My Probation.
Availability: This area may not be turned on for your company yet. If you don't see it in your menu, it isn't enabled — check with your HR team.
Checking your probation
Check the original end date and any extension date and reason. Once confirmed, review the confirmation date and HR’s notes.
Steps
- Go to My Workspace > My Probation.
- Review each probation review card.
Your separations
This page is where you start a resignation and track its progress. Open it from My Workspace > My Separations.
Tracking your resignation
Review your proposed last working day and request status. Initiate Resignation is available when you do not already have an active separation in progress.
Steps
- Go to My Workspace > My Separations.
- To start a resignation, select Initiate Resignation — see Initiating your separation.
- To check progress, review the card for your request and its status tag.
Initiating your separation
This page covers submitting your resignation for HR to review and approve. You reach it from your separations.
Steps
- Go to My Workspace > My Separations.
- Select Initiate Resignation.
- On the Initiate Resignation page, fill in the Resignation Details:
- Resignation Date (required) — the date of your resignation.
- Last Working Date (required) — your proposed last working day.
- Reason for Resignation (required) — the reason for your decision.
- Additional Notes — any extra context (optional).
- Select Submit Resignation. To leave without submitting, select Cancel.
After you finish
After you submit, you're taken back to your separations, where your request appears with its current status. HR will then review and process it.
Tips
- If you already have a separation request in progress, the Initiate Resignation button won't appear — you can only have one active request at a time.
Checking your final settlement
Open My Settlement to review a settlement HR has recorded for your exit. Employee Lifecycle must be enabled and you must retain account access.
Check the currency, labelled additions and deductions, and net amount. Contact HR or finance about a line you do not understand before relying on the total. A paid status means staff have recorded payment; compare it with the payment you receive.
Your employment end date and settlement payment are separate. Ending employment does not mean every payment is complete. If you no longer have access, ask HR for a copy and a way to follow up.
Completing assigned joining and exit tasks
Open Assigned joining and exit tasks in self-service when HR assigns you part of an employee's joining or handover. Each row shows whether the task is for someone joining or leaving, the employee, and their joining or last working date. Review the task before marking it complete, and record a useful note, such as where equipment was returned or which person received a handover.
Mark a task Completed only when the work is done. Ask HR to waive a task that does not apply; assignees cannot waive tasks themselves. Completing a task does not complete the employee's onboarding, end their employment, disable their account, or record a settlement payment.
HR cannot complete an onboarding or end employment while a required task is still pending, so complete your tasks promptly or tell HR what is holding them up.
Default joining and exit tasks
With permission to manage settings, open Settings → Joining and exit tasks. List the tasks under When someone joins and When someone leaves. Give each a title, an optional owner, and choose whether it must be done before completion.
Changes apply to onboarding started and separations recorded afterwards; existing records keep their tasks. Add one-off tasks on the record itself.